Get ideas & inspirations delivered to your inbox. You won't want to miss a thing, so subscribe free to the Blog Feed or sign up for Free Email Updates on the latest projects, shop news, blog tutorials & more. Check out the Project Gallery, Garden, Recipes & Inspirations tabs above, to see what you have missed. Browse through the sidebar for this week's Popular Posts!
**Please note: Some links may be broken, if this happens, please let me know which post & search for the title of a post on the search tab on the right while I work on fixing the problem.---->

How to Make an Outdoor Water Fountain

How to Make an Outdoor Water Fountain
This little project can be intimidating, 
but it is easier than I thought.
First decide where you want to place your fountain, 
how large you want it to be, and how you want it to look.  
This will let you to know what supplies you 
will need for your project.
For this particular fountain, I used a reservoir, 
in other words, a plastic container/ tub.
I placed the tub on the ground and used the shovel 
to outline the size of the hole that I needed to dig. 
This way the tub can fit snugly in the ground. 
Don't do labor? No worries, have someone do it for you, 
I won't tell.
The hardest part was the digging, 
this can be a good work out though.
For me the best time do this little project is early in the morning 
when it's cool out and 
the pesky mosquitoes are not around to bother.
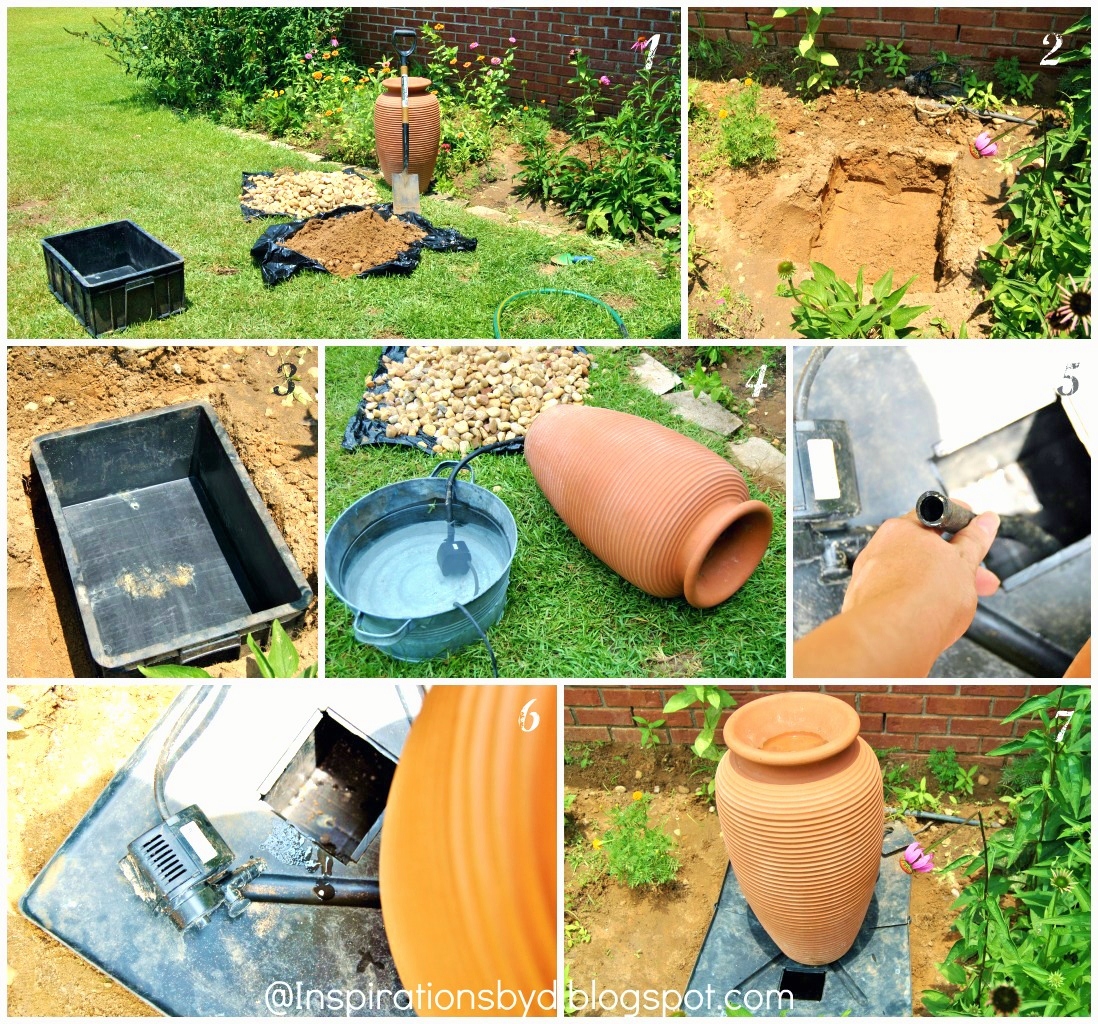
1. ...Make sure you have all your supplies.
  A Terra Cotta Urn for fountain, Shovel, River Rocks, Dirt that you have dug for re-fill, 
water pump with pipes and tubing.
2. Dig, dig, dig.
3. Fit tub in hole making sure that you leave two inches under it for drainage, 
do this before adding water.  The tub should come with a lid, 
so cover it leaving the opening exposed to fill with water later.
4.  Test the water pump by putting it into a bucket of water 
to see if the motor runs properly.
5. Connect pump to the pipe under the urn.
6. Fit the pump in the reservoir before adding water. 
   7. Once your pump is working properly adjust the water flow, 
and adjust level of urn...
...add your design elements, (ex. water inside the reservoir, rocks around the urn) 
The water pump should remain submerged in the water reservoir and accessible
 for adjustment, repair and cleaning by leaving it near the opening of the tub inside 
the reservoir.  This will allow you to easily remove the rocks over it 
and just reach in to grab when needed.
There you have it, a water feature for your yard.

Gardening in June

Gardening in June


I've been out and about in my yard getting the garden ready for summer.
This time of year most gardens have begun to flourish already, I can see all the colors of different
blooms in my flower beds and the energy that we put into gardening all spring really pays off.

However, once planted, the garden needs to be weeded and watered regularly.
You will need to supply your garden with water if it receives less than one inch
of rainfall a week.  I tend to do a rain dance in the hope that we get some rain during the week.

What I have done to control weeds and conserve moisture is to mulch around my plants.
Plants with heavy flowers, or that are very tall, may need some staking by June.
I have found a few of my own that I have supplied with stakes.
The roses you see above are held by stakes.

Peonies with their full blooms can droop to the ground about now, so you may
want to use one or several pole stakes with string depending on how large your plants are.
Annuals such as cosmos and perennials such as foxglove grow tall and may need to be staked as well.  I found that this year my gardenia bushes are full of blooms that make it droop and I have had to supply them with stakes as well.

There is still work to be done and trees to be planted before summer is actually here,
my avocado plants are tall and need to be transplanted, my lemon tree needs a larger pot 
 and our gourd vine which our sweet neighbor gave us, needs a place in the garden as well.

Happy Gardening!

How to Customize your Blog Post Title

How to Customize your Blog Post Title

How to Center you Post Title on blogger
If you are looking to center your blog post title on blogger, 
you  must first sign into your dashboard.
Once you are on your dashboard, click the Template tab ont he left of your screen.
Now click on the Edit HTML tab under your small avatar.
The HTML box will pop open.
Before you continue, make sure that you save your template to your computer
in the case that anything goes wrong , you will have it backed up.
Now that you are on the Edit template page, you need to search for:

.post h3 {

margin:.25em 0 0;

padding:0 0 4px;

font-size:140%;

font-weight:normal;

line-height:1.4em;

color:$titlecolor;

}

*For a quick search, click (Ctrl +F)
You will see on the top right corner the search box, 
type in .post h3{ and it should take you there.
Now under the 

.post h3 { 
 , add: text align: center:

It should look like this:

.post h3 {
text align: center:

margin:.25em 0 0;

padding:0 0 4px;

font-size:140%;

font-weight:normal;

line-height:1.4em;

color:$titlecolor;

}


Preview before saving to make sure it worked, if it worked then save it.
If it did not, you may have a customized template and need further search.
Click (Ctrl +F) and  type in posts
You will be taken to the Posts part of your html template code.

Scroll slowly and look for h3.post-title, h4 {
add  text align: center: under it and preview your work. If it worked save it.

If neither works, you have to ask your template designer if it is a custom design for assistance.

How to Align Left or Right your Post Title on blogger
If you are looking to move your title to the left or right of your post, then add  
text align: left: for left
 text align: right: for right
instead of the center alignment.

For more blog tutorials click here.

Summer Toast

Summer Toast
I made this colorful summer toast over the weekend for the family, 
and they were absolutely delicious!
Love the simplicity of it and how everything is layered on it.
1- Toast your bread & spread butter on it.
2- Make your favorite eggs & layer on toast.
How do YOU like your eggs?
3- Sprinkle your favorite cheese, I used mozzarella.
4- Saute red onions, green pepper, red pepper, yellow pepper, and mushroom,
season with salt and pepper and layer over your eggs and cheese.
There you have it, Summer Toast, full of color and flavor.
Enjoy!


Pin It button on image hover