Get ideas & inspirations delivered to your inbox. You won't want to miss a thing, so subscribe free to the Blog Feed or sign up for Free Email Updates on the latest projects, shop news, blog tutorials & more. Check out the Project Gallery, Garden, Recipes & Inspirations tabs above, to see what you have missed. Browse through the sidebar for this week's Popular Posts!
**Please note: Some links may be broken, if this happens, please let me know which post & search for the title of a post on the search tab on the right while I work on fixing the problem.---->

DIY: Rock Monster Paper Clips

DIY: Rock Monster Paper Clips
These little rock monsters really inspired me.  
Zoe from Coastal Inspired Creations made some amazing little rock monsters 
using rocks, paint & magnets. They have
captivated my son and we just had to make some of our own.

I had on hand some acrylic painted gems for this little project, so I did not
have to paint any rocks.  We also wanted to add our own personal touch, 
so instead of magnets, we made rock monster paper clips.
Here is what we did; you have to include the kiddos for this craft.
  • Sharpie pen
  • White craft paint marker
  • Large paper clips
  • Googley eyes (self-adhesive)
  • Rocks/ gems already painted
  • E6000 glue or crazy glue -(for gluing the clip to gem)

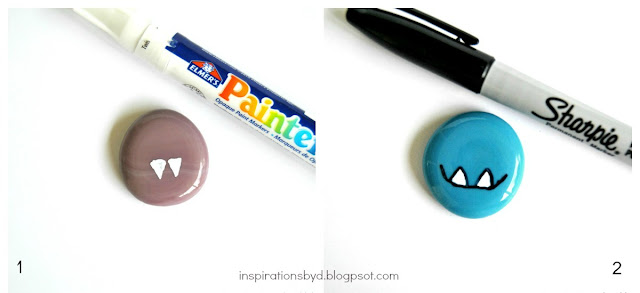
1. Draw teeth in the shape of triangles or squares with the white paint marker.
2. After the white paint is dry, make an outline with the black sharpie to draw the mouth.
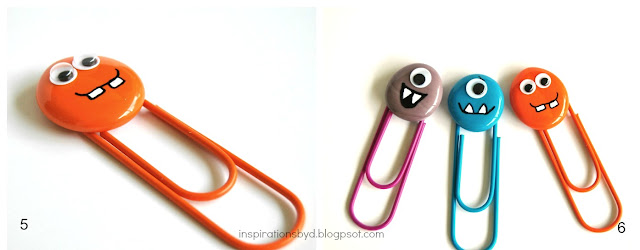
3. Add the eyes, since they already come with adhesive, all you have to do is stick it on.
4. Glue the clip to the rock or gem and let it dry.
hot make rock monster paper clips
Aren't they cute?
They are great for favors, gifts and even Halloween giving instead of candy.
Hope that you enjoyed.
Happy Crafting and a big thank you to Zoe!

Orange Inspiration

the foundary.com

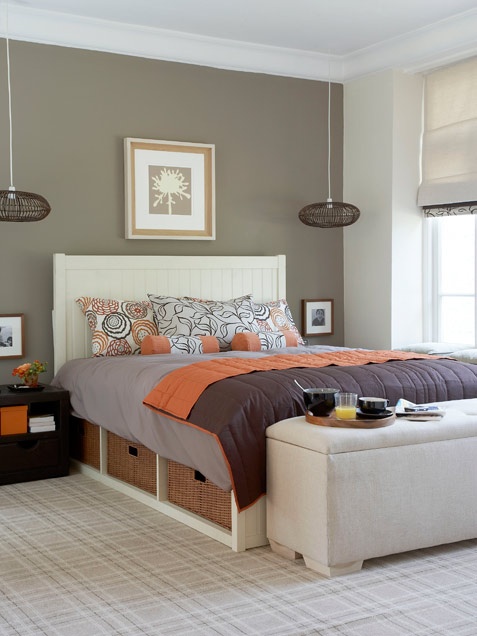
Orange?  Who would have thought?  
bhg.com
Any shade of orange gives a room, a furniture piece, and walls,  a pop of
well... happiness & warmth.  I've mentioned it before and I'll say it again, 
color lifts the mood.  So if you are looking to be inspired this fall, add a punch
 of orange to your life.  Autumn is a perfect time to display this hue in your home,
office and even your own wardrobe.  
For more orange inspiration visit The Foundary on Pinterest.
I hope that you enjoyed these orange inspired spaces.


How to Decorate a Slate Chalkboard with Washi Tape

How to Decorate a Slate Chalkboard with Washi Tape
I have been wanting to makeover my slate board for quite a while, 
but I just never got around to doing it, until now. 
I wanted to paint it, but who wants to work with messy paint &
wait for it to dry when you can give it a face lift with washi tape. 
These adorable designer tapes work wonders and I love how easy they are to use.
The tape I used for this makeover fit exactly the width of the frame, 
so all I had to do was stick it on.
Here is what I used
washi tape
chalkboard
scissors
The ideas are endless.
Happy Makeover!


Large Homemade Bubbles

Large Homemade Bubbles
Guess what we did on another gloomy and rainy day.
We created large homemade bubbles.
I have to admit, even the adults had fun with this little project.
We tried to make even larger bubbles by using a hula hoop, that didn't work,
but our racket did!
We made our bubbles with one part dish detergent and one part water.
So if you use 1/2 cup of water, then you need 1/2 cup of soap.
Mix the soap & water well and pour it into a large flower pot dish.
To make large bubbles, we used an old broken racket. 
We removed the strings and bent it a bit to submerge it into the bubble dish.
Make sure the racket or whatever item you use is completely under the bubble mix.
Then pull it out carefully and either blow the soap film on the racket 
or simply move it in the air forming a bubble.
Hope that you enjoy!


Typewriter Key Push Pins

Typewriter Key Push Pins
I love these push pins, they are unique in every way.
Stop by the shop today and check out the items that have been posted.
Available at Inspirations by D Etsy.
More goodies coming soon so stay tuned!

How to Decorate Clothes Pins

How to Decorate Clothes Pins
My little boy loves to draw and he has the largest collection of art work that I have 
ever seen.  It's important to me to show my little guy how much I value his work, 
because in the long run it builds up his self confidence. 

I love to display his creativity. 
I think it is beautiful and he always puts a smile on my face
when he draws something especially for mommy.
In previous posts I gave ideas on how to display your child's art work.

Today I'm passing on more ideas with a little creative tutorial 
on decorating clothes pins to hang art or whatever your heart desires.

You will need the following:
  1. Scissors
  2. Decorative tape (ex: washi tape, fabric tape, scrapbook tape...)
  3. Wooden clothes pins 

Are you familiar with this tape?  It's Smash by K & Company. 
I just love their products.  You can find them in your local craft store.
1. Measure the amount to be placed over the 
clothes pin by placing the pin over the tape.
2. Cut and press over the pin.
3.  You have the choice to either cut off the remaining tape 
or press it in, covering the sides of the pin as seen below.
Use these cute pins to hang your children's art work and create a wonderful display.
Hope that you enjoy and Happy Crafting!


Teal and Yellow Color Inspiration

kurtboomerphoto
thedecorologist
HGTV.com

So glad to see you here!  Today I am sharing some color
inspiration for spaces in your home.  If you are a teal and 
yellow color lover, this is for you.
Don't you love how the yellow pops in the spaces above?
It gives each room a feel of sunshine, happiness, & cheerfulness.
The blue is more serene, calm and collected.
 They are a perfect marriage for any decor.  
Hope that you enjoy!


Pin It button on image hover