Get ideas & inspirations delivered to your inbox. You won't want to miss a thing, so subscribe free to the Blog Feed or sign up for Free Email Updates on the latest projects, shop news, blog tutorials & more. Check out the Project Gallery, Garden, Recipes & Inspirations tabs above, to see what you have missed. Browse through the sidebar for this week's Popular Posts!
**Please note: Some links may be broken, if this happens, please let me know which post & search for the title of a post on the search tab on the right while I work on fixing the problem.---->

DIY: Pom Pom Ornament

DIY Pom Pom ornament
handmade christmas ornament

I love to try new things each year, last year I made this Felt Ornament and I loved it. 
This year's craft ornament is a Pom Pom made of yarn.  
It's easy to make and a wonderful addition to any tree or decor including decorating gifts.
So to make this pom pom ornament you will need:

yarn 
pencil 
scissors or x-acto knife

You can get a template or pom pom kit at any craft store or make your own.  
If you wish to make your own here is a template to print out in different sizes.  
You can use cardboard or plastic.

I was going to give you step by step directions on how to make a pom pom,
 but I found this site and she explains it perfectly well.
I hope that you enjoy the tutorial and let me know if you make any pom poms.
pom pom ornaments
Happy Crafting!


DIY: Advent Calendar

DIY Advent Calendar

Today I'm exited to show you my first handmade Advent 
Calendar.  I had fun creating it & my little man couldn't wait for
it to be completed.  I saw this one on Pinterest,
but couldn't find the original post for it anywhere. 
I decided to make mine with yarn & jute twine lacing.  
If you like it, and want to create your own, here is what you will need:
    
     SUPPLIES
    - plain board as seen below
    - yarn & jute twill
    - white craft paint
    - paint brush
    - clothes pins
    - washi tape, paint, glitter double sided tape or glitter sticker craft paper...(be creative)
    - strong glue like E6ooo
    - red marker
    - drill
I began by having Mr. M drill holes around the board two inches apart from one 
another and an inch off the side of the board.
Then I painted my board in white and set it aside to dry.

While my board dried, I decorated the clothes pins with washi tape.  I used several 
variations such as red glitter, silver glitter, dotted red washi tape and so on. 
After I finished off my clothes pins, and the paint was dry on the board,  I grabbed my 
strings and started lacing them around the board.  I tied the end off to keep it sturdy.  
After the board was laced, I added a boarder with the silver and white washi tape.
I think it gives it a finished look.  

Once my border was done, I glued each clothes pin to the board.
I'll be honest, I didn't measure the distance between them, 
I just eye balled it to look parallel from one another if that makes any sense.  
After gluing them, they were set to dry.

How to make  Advent Calendar
 I used a red marker to make my numbers.  I wrote each one over each pin.

There you have it, our first handmade Advent Calendar, my son loves it!
Will you have an Advent Calendar this year?
Happy Crafting!
Angels Glass Magnets (Updated)

 I was inspired to make these lovely glass magnets by this poem.
Christmas Angels

Reach for an angel high on a star;
She sends you Christmas wherever you are,
Bringing you laughter and faith so supreme,
Touching your heart with a beautiful dream.

Peace and goodwill in each loving home,
Beauty and magic so surely your own.
Sweet Christmas angels - moments of love,
Part of the wonder God sends from above.

Santa and children - this wonderful day,
Hope for tomorrow in words that we pray,
Tree reaching tall - such a beautiful sight,
Music we treasure is heard on the night.

Bless you, my dear ones, this so holy time;
May God's richest blessings forever be thine,
Glad tidings I send you across every mile
Along with a faith to make each day worthwhile.

God's Christmas angels, precious and dear,
For a Merry Christmas lasting through a New Year.
By Garnett Ann Schultz 

The angels spreading the message of peace is a lovely reminder of the Holidays.  Drop a set of magnets in someones stocking this Holiday or make it part of your decor.

Personalized Ribbon Review


per_cen_cont
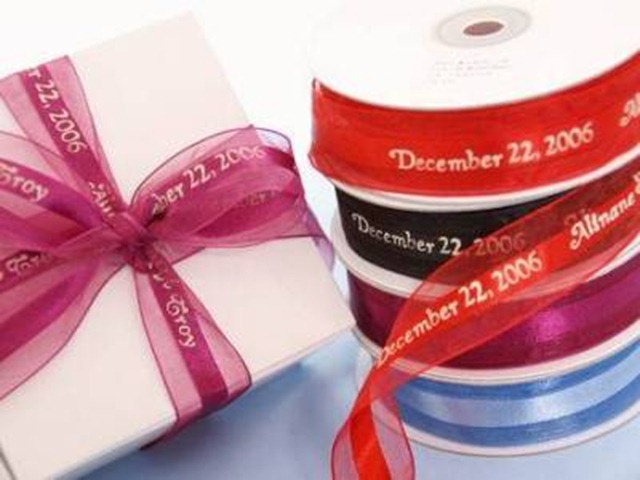
Hello friends!  I am writing to you today about CraftsnFavors.com and their personalized ribbon for favors.
Crafts & Favors has kindly asked me to write a simple review about their personalized ribbons.  CraftsnFavors.com has a large range of supplies ensuring that you can make your wedding or other great events as unique and personalized as you like.

What makes the personalized ribbon for favors special is that your guests will remember your special day because the date and names are printed on the ribbon for them to always remember.  Let me just state that these ribbons lasts a lifetime.  Throughout my young life, my parents attended many weddings and Baptisms and I have to say that the one thing that stuck out the most about favors were the ribbons.  My mother had a huge collection of favors on a shelf.  The favors had the date of each couples wedding date and names.

If you are thinking of having a wedding or any special event, or know someone who will, these ribbons may be something for you or them to consider.   Visit them today and check them out.

(Disclaimer) This is a Sponsored post written by me on behalf of personalized ribbon for favors.  All Opinions are 100% mine.

DIY Glitter Votive

glitter votive

I have a scented candle that I love, although I can't light it up due to allergies and asthma, 
I keep it warm to release the fragrance and it works well that way.  As you can see it's
 green, and although I love green, I don't have green decor in my home, so I decided to 
dress it up with a lot of glitter.
I used what I had on hand, my votive, Mod Podge glue, paint brush, and the glitter.
For those with unsteady hands,
I recommend using masking tape to cover the area where you will not add glitter.
-- Simply paint your glue onto your votive.
-- Then sprinkle or roll on your glitter and that is it.
Now you have a sparkling votive perfect for the Holidays and great for New Years.
Happy Crafting!

Linking to:
Craft O Maniac
Polka Dot Pretties
Create with Joy
My 1929 Charmer
Tutus and Teas Parties
A Night Owl
The 36th Avenue
Sew Chatty
The Trendy Tree House
Lil Luna
Salt Tree

Easy Chalkboard Lettering Tip

Easy Chalkboard Lettering Tip
Chalkboard Lettering Tip
DSC_0613
How to create Chalkboard Lettering

Here is a simple and easy tutorial to get that chalk font that you have
been seeing all over the net on your own chalkboard.

  • Simply print on paper, the art or words you wish to draw on your chalkboard.
  • On the back of the print, use a chalk to color over the print, make sure you cover the print completely.
  • When you are done, take a pencil and trace over the print so that the chalk will transfer over to your board.
  • Then if you wish, color in with chalk or chalk ink or make necessary corrections to your transfer.

DIY: Felt Ball Ornament (Updated Photos)


 It's that time of the year again when everyone shops, travel, entertain and
decorate for the Holidays.  This year I wanted to add white to my Christmas tree,
 so I opted to make my own white felt ornaments.  Do you remember the scrunch flower tutorial?

In this tutorial you may use that method or use the method below to make the scrunch flower.
Lets begin.
(1)  You will need the following:

       (2)   Using your round template/cup, trace circles on the felt.  Cut out your circles.  {To make several of these ornaments, you will need lots of circles.  Each of these flowers has about 5-6 felt circles.}   Make sure you cut a smaller circle for each flower that you make, it will serve as a base.

       (3)   Place a drop of glue on the center of your large circle and fold in half.

       (4)   Take your folded circle and fold again in the shape of an "s" or use the method on the previous tutorial.  Either one works fine.  The "s" form gives it more depth.
www.inspirationsbyd.blogspot.com

(5) Glue the folded pedal to the base and continue gluing your folded pieces 
around the base until it's filled.

(6) Place the top pedal to cover the open center.

(7)  When done, this is what your flowers will look like.  Repeat for more felt ball ornaments.

(8) Turn your flowers over to their back.

(9) Cut a piece(s) of ribbon; glue one end of the ribbon to the back of the flower 
using one drop of glue.  Glue the other end of the ribbon over the glued ribbon to hold it in place.

(10) Add glue to the back side of another flower and lay over the ribbon & flower.

(11) Press firmly to make sure it is glued properly and evenly.

(12)  This method should form your scrunched felt ball.

You may spray it gently with adhesive and add sparkle to your ornament(s) with fine glitter.
And there you have it, a Scrunched Felt Ornament.


Happy Crafting!!


Hot Apple Cider & a Case of the Sniffles

apple cider

It's November and cold weather has set in, time for some delicious hot apple cider.

DSC_0624
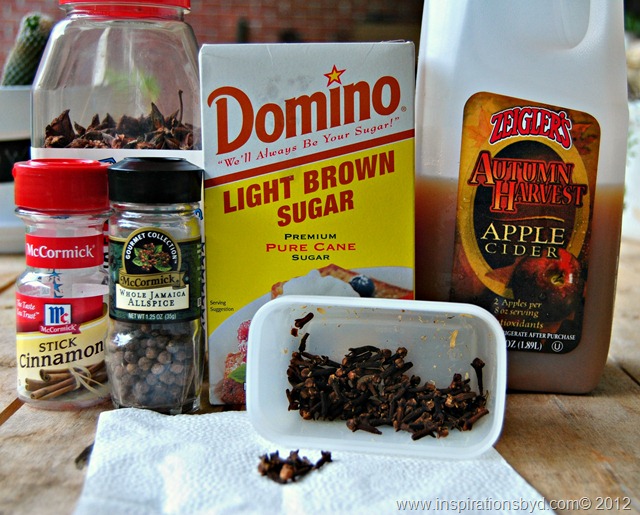
I grabbed what I had on hand for this recipe.  
  • 2 cups of apple cider
  • 1 teaspoon of whole allspice
  • 2 whole cinnamon sticks
  • 1/2 teaspoon of whole cloves
  • 3 teaspoons of brown sugar
  • 2 star-shaped anises optional (garnish)
  • apple optional (garnish)

Apple Cider recipe
 As I poured the cider into a small saucepan, I turned on the heat to high.
I added the spices first, the whole allspice, cinnamon sticks,
whole cloves and then the brown sugar.

You do have the option to wrap the allspice and cloves in a cheesecloth and then
add it to the pot.  I simply strained everything instead.
Bring it to a boil and then reduce the heat and keep it warm.
Pour it into a cup and add garnish if you wish, then serve.
I added my anise star and cinnamon stick.
You can also add an apple slice as I did below to impress guests.  
How to make apple cider
apple cider recipe

apple cider recipe
apple cider recipe

Enjoy!


Wrapping Wall Station Inspiration

PotteryBarn
Hey you guys, I've been working on a few things and I wanted to give you an 
idea of what one of my little projects is about.  I have seen several cool wrapping 
wall stations around the internet and let me just say that they are pretty expensive.  
You know me, waste not want not, so I'm a mission to create my own.

I've been gathering photos for inspiration and plan on using them to make the station that is right  for me.
So I have started gathering materials from my garage, I have found wood and other lovely pieces laying around to make this happen.  It's time to cut and glue.  Stay tuned for the reveal coming soon.  For now, enjoy these inspirations.
 
images above:potterybarn
 
 Enjoy!


Hurricane Sandy

We will like to take a moment to extend our thoughts and support to everyone that was impacted by Hurricane Sandy in the North East.  We are from New York and have many family and friends there.  We understand the difficulties and frustrations associated with cleaning up, rebuilding homes, businesses, and lives.  

Many are still without power and many have lost everything.  Our hearts and prayers are with them.  Like many people, if you are wondering how to help those who have been unfortunate in this disaster, you can donate to the American Red Cross or check out Charity Navigator for other charities that are accepting donations to assist victims of Hurricane Sandy.

We will continue to keep everyone that was impacted by this storm in our prayers and hope for the safety of all.  A big thank you for all those that help each other there during this time.


Pin It button on image hover