Get ideas & inspirations delivered to your inbox. You won't want to miss a thing, so subscribe free to the Blog Feed or sign up for Free Email Updates on the latest projects, shop news, blog tutorials & more. Check out the Project Gallery, Garden, Recipes & Inspirations tabs above, to see what you have missed. Browse through the sidebar for this week's Popular Posts!
**Please note: Some links may be broken, if this happens, please let me know which post & search for the title of a post on the search tab on the right while I work on fixing the problem.---->

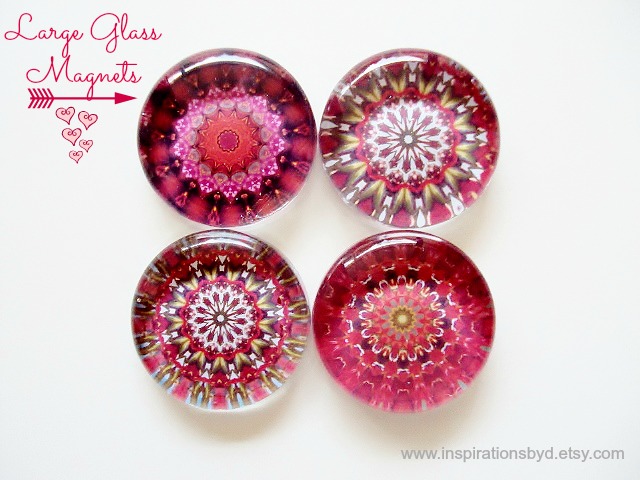
Decorative Pink Magnets

decorative pink magnets
These lovelies are my latest addition to my Shop with more to come.  
 I'll have greens coming as well as blues, so if you are not subscribed to the blog,
subscribe today to be the first to know when they are posted in the shop.
You  may also follow IbD on Facebook or Twitter for
Shop updates and special discounts.

I was inspired to create these after viewing bright candy 
while walking around the old town of St. Augustine in FL, 
I was inspired by the colorful and bright swirls that decorated the candies 
with rich hues that interchanged from dark to light as if forming a jewel.

Every time I make these beautiful magnets, I can't help but admire them. 
The glass is hand poured, they are round and vary in thickness. 

I fell in love with these magnets when I made my first set. 
They are just beautiful and they are unique in every way.
I use mine to hold several papers at a time including photos and cards.

I also wanted to remind you that we have these Letter Glass Push Pins available here.
They will be the last push pins for now and I won't make any more until after the summer.
Hope to see you at The Shop and wish you a Happy Weekend!

Inspired by Pink

Pink decor
Ever thought of using the color pink in your home? I know, I know,
who would've thought?  But take a look at these inspirational ideas,
they look pretty don't they?  Why not brighten up a space this winter
with unexpected touches of pink.  Have you ever thought of bringing in a little
feminine color to your space?  Perhaps not, but take a look at these inspiring
spaces with just a touch of blush.
via
I was organizing my closet and came across several pink items for 
the home that were given to me by my Mother-in-Law over the last few years.
They are mostly linen and towels, but bright and beautiful pillows, lamps,
window treatments or candle holders can bring dramatic flair to a ho-hum
bedroom or living room.
How about paint?  You don't have to re paint an entire room to enjoy
the benefits of bright colors.  Choose one or two smaller pieces of furniture--
bookcases, end tables, cabinets or even a door--and give them an instant
makeover with a coat of your choice of shade of pink paint.
pink table
via
via
pink party straws
via
And don't forget the power of table settings.  Perfect for the upcoming
Valentine Holiday, have your guests warm up to the pink tones by dressing
your table with pink and also serving some yummy pink treats.
pretty pink setting on old farm table
via
What do you think?
Be inspired and enjoy!

Valentine's Day Printables (Free)

I got a little creative this weekend and made these Valentine prints for my own personal use.
I wanted to hang them in my home and figured why not share them with you.  
Download your own for free and use them for your own art purpose.  
Frame them, make cards with them and more.
I hope that you enjoy!

Download grey print here.

Download this blue print here.

Download this dark pink print here.

Download this yellow print here.

Download this pink print here.

Valentine's Day printables
For more free printable's visit this post.


How to Remove Borders Around your Post Images

remove borders around images
How to remove borders around your post images.
  1. Click "Design" on the top right corner of your screen.
  2. Click the "Edit HTML" tab under live blog
Then click at the same time, "Ctrl - F", a search box will pop up on your top right side of the screen.


Find the post image style:


.post img {
  padding:4px;
  border:1px solid #ddd;
  }


Change the border to 0px:


.post img {
  padding:4px;
  border:0px solid #ddd;
  }


The padding is space around the image which will remain.


If you have a different code like mine and can't find the code above try the one below.


Look for this post image style:

.post-body img, .post-body .tr-caption-container, .Profile img, .Image img,
.BlogList .item-thumbnail img {
  padding: $(image.border.small.size);

  background: $(image.background.color);
  border: 1px solid $(image.border.color);

  -moz-box-shadow: 1px 1px 5px rgba(0, 0, 0, .1);
  -webkit-box-shadow: 1px 1px 5px rgba(0, 0, 0, .1);
  box-shadow: 1px 1px 5px rgba(0, 0, 0, .1);
}
Change it to this:

post-body img, .post-body .tr-caption-container, .Profile img, .Image img,
.BlogList .item-thumbnail img {
  padding: $(image.border.small.size);

  background: $(image.background.color);
  border: 0px solid $(image.border.color);

  -moz-box-shadow: 0px 0px 0px rgba(0, 0, 0, .1);
  -webkit-box-shadow: 0px 0px 0px rgba(0, 0, 0, .1);
  box-shadow: 0px 0px 0px rgba(0, 0, 0, .1);
}
Click "preview" to make sure the border has been removed, if  your border has been removed and you are pleased, then click "save template" and then close. 

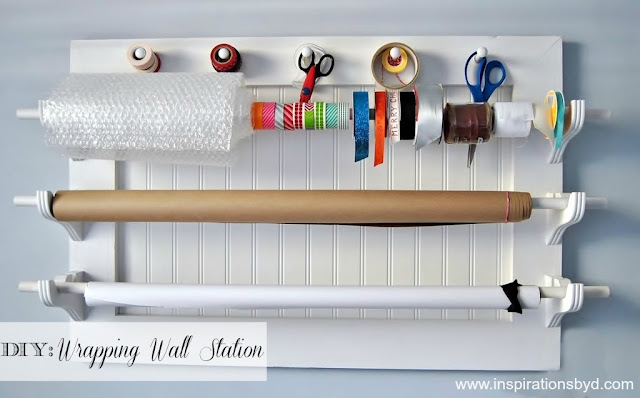
DIY: Wrapping Wall Station (Part 2)

wrapping wall station
Now that we have completed this project, and you have viewed Part 1
the finished piece, let me show you how we did it.
After researching for some lovely gift wrap station inspirations, I finally decided on a design.
DSC_0701
We used several scraps that were found in our garage and purchased a couple
of curtain brackets to complete the project. 
DSC_0702
We had extra bead board laying around from our Mudroom Entry Project and extra
pieces of wood from pallet boards, "whoop, whoop for free wood".  You can also find
these wood boards at low prices at your local hardware stores.  My challenge was
finding the wood curtain brackets.  They were sold out at the hardware store,
so I checked Holly Lobby for them and jackpot!
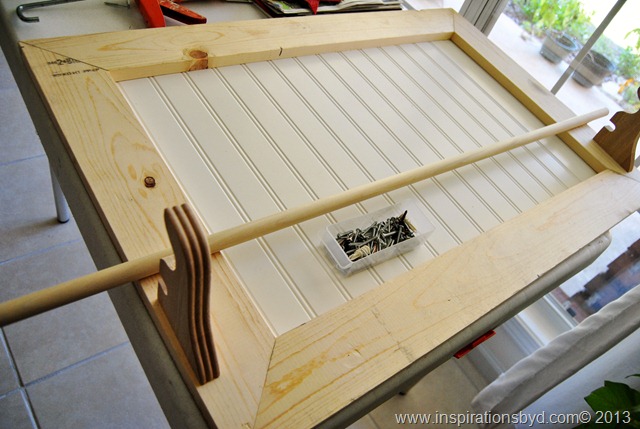
Making the board was fairly easy; Mr. M cut the wood to form a frame, then nailed
the bead board to the back. I filled in some holes with wood putty and then
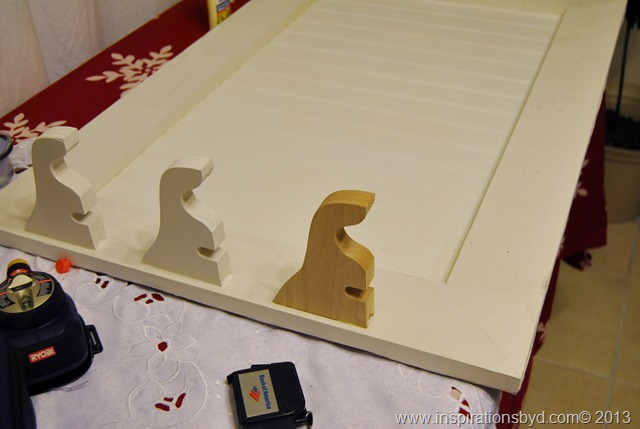
Mr. M attached the brackets using the screws provided.
Hint:  If you have an old large picture frame laying around,
it will work well in making a lovely gift wrap station for yourself.
DSC_0705DSC_0707I didn't tell you that when I went to the craft store, they only had two bracket
sets available.  After two weeks of waiting, they finally received more in stock
& I was able to get the two brackets that I needed along with some pegs
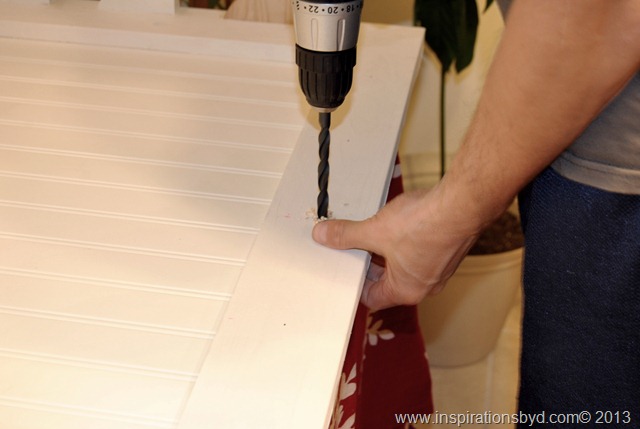
for my wrapping wall station.  Once the brackets were on, he drilled holes
to fit the pegs in.  They fit perfectly and we didn't need wood glue.
DSC_0715DSC_0717
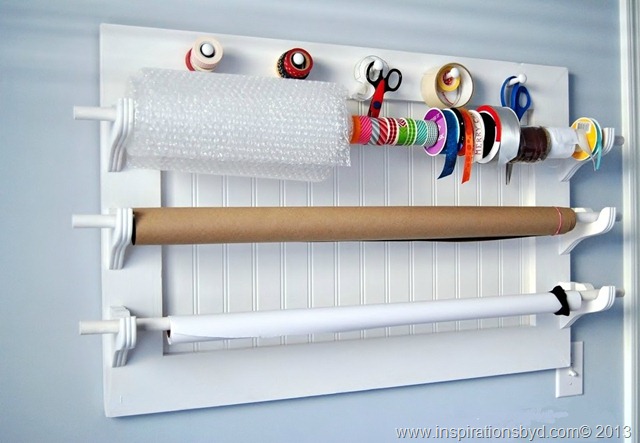
I finished painting the wall-mounted gift-wrapping station
and I am in love with it.
DSC_0728DSC_0726
DSC_0829 (1)
Supplies Used for this Project
  • bead board or any flat surface
  • frame or wood panels to make a frame
  • cutting tool/ saw
  • 6 brackets with hardware
  • pegs (used 5)
  • drill to create holes
  • nails or liquid nails
  • paint
  • paint brush
  • wood putty if needed
  • picture frame hardware for hanging
Happy Crafting!


How to Center Gadget Titles on Sidebar

Moving along the blog design changes...
how to center gadget titles on sidebar

How to Center Gadget Titles on your Sidebar on Blogger

As you may or may not know, I accidentally deleted my blog template.
I thought about buying an already made template, but because I am
the type of person that is always making minor changes, I decided to create it myself.

One of the first things I wanted to do was to center my gadget title.  
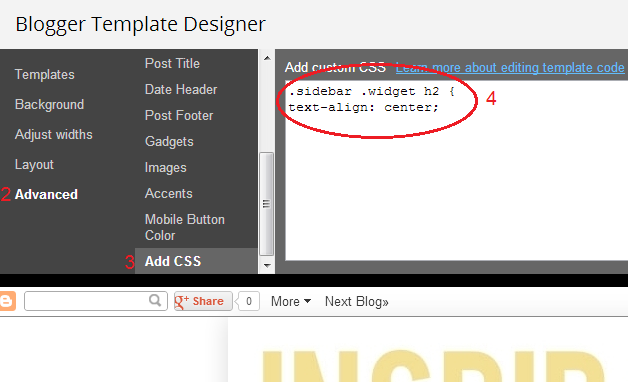
  1. Using the new version of blogger, click on "design" on the top right corner of your screen, then click  the orange "customize" button under live blog.  
  2. Click on Advance 
  3. Scroll down to "Add CSS"
  4. Add this code in the white box.
          .sidebar .widget h2 {
           text-align: center;
            }
    5.  After you type it in, click the space bar once, so you may view a preview below it.
    
    6.  Look over your preview, if your gadget titles are centered, and everything looks right, 
         then click on APPLY TO BLOG.

There you have it, now your gadgets are centered.

To Undo
To undo centering, just go back to CSS and delete the code 
or go to HTML, save template before you do anything!
Click " Ctrl & F"
In the search box that pops up, type .sidebar .widget h2

You will see it highlighted on your HTML template code, just delete the code there
and then save template.

How to Center Gadget Titles on your Sidebar on Blogger using HTML

For this tutorial you will need a little HTML knowledge.  To manually change the gadget title
on your side bar you will have to sign into your blogger account.
1. Click on the blog you wish to make changes to.
2. Click on "template" on the left of your screen.
3. Under the "live blog" click on "Edit HTML"
4. You are now on the "Overview" screen, click on "Ctrl" & "F" keys to open your search box.
5. Type in your search box "sidebar" and enter.
6. Sidebar will be highlighted on your HTML blog code
7. Look for this code:
.main-inner .sidebar .widget h2 {

8. Under that code paste this code:
text-align: center;.sidebar {

9. It should now look like this:
.main-inner .sidebar .widget h2 {
text-align: center;.sidebar {

10. Click the Preview template tab to view your blog and see if the changes have been made.
      If the sidebar title is centered, then click "save template".  Your sidebar title is now centered.


Enjoy!

What Have I Done?

This is a brief post only because I am so upset at myself right now.
Have you noticed something different?  I can kick myself for this!
I accidentally deleted my template.  Who does that?  Me!
I worked so hard to get it just right and it is all gone, poof just like that.
I had no intention of changing it, now I am forced to.  Is this a sign?
You guys, I am so...ugh...right now.  I cannot focus!
So here is the thing.  I want to fix this problem,  but I can't today
because it's my son's Birthday, so bear with me with this temporary template.
Ahhh!  I can't look at it!  Oh dear friends I will work on this later.


DIY: Wrapping Wall Station (Part 1)

wrapping wall station
Hello friends, today I am happy to report that my Wrapping Wall Station
has been completed,  hurrah!  I am loving this station!
I also found this one, and fell in love with it, so I incorporated 
that one with the Pottery Barn model and this 
is how it turned out, what do you think?
This is easy to make friends.
View Tutorials HERE.

New Roof

roof_repair_2
Hello friends.  Hope that you are having a wonderful day today.  I have taken this 
opportunity to tell you a bit about my roof replacement experience.  We replaced our 
roof back in September, do you remember that?  It was this post with the yummy 
White Hot Chocolate drink.  You must be wondering why I'm even writing about this,
but I've had a few people ask me about it and were wondering
how things were going with the new roof.

roof-repair-640-480_20100714111508_640_480
Let me just write that I am glad it is over and done with.  The noise, the mess and
the smell, yes people, the smell, was not pleasing at all.  If I may put it bluntly, 
it was awful on the outside, I don't ever want to do it again.  But I have to admit, 
after all was said and done, it was worth it.  We now have a fabulous new roof, 
way better than the original and up to now, have had no problems.  
Hope it stays that way for a long time.  
The reason we had our roof replaced was because we had 
damage from several hail storms and finally had a leak in our bedroom and 
our son's room as well.  So the contractor came and gave us a new roof top, huraay!

If any of you reside in Canada, there is a great roofing company 
there couvreurs montrealand you may visit their website, couvreu(Disclaimer) This is a Sponsored post written by me on behalf of Layla Grayce.  All Opinions are 100% mine.r montreal
to view their services and other information. 


(Disclaimer:The above is a review,
 all views expressed are my honest opinion.)


Pin It button on image hover