Get ideas & inspirations delivered to your inbox. You won't want to miss a thing, so subscribe free to the Blog Feed or sign up for Free Email Updates on the latest projects, shop news, blog tutorials & more. Check out the Project Gallery, Garden, Recipes & Inspirations tabs above, to see what you have missed. Browse through the sidebar for this week's Popular Posts!
**Please note: Some links may be broken, if this happens, please let me know which post & search for the title of a post on the search tab on the right while I work on fixing the problem.---->

How to Lower Your Tabs on Blogger

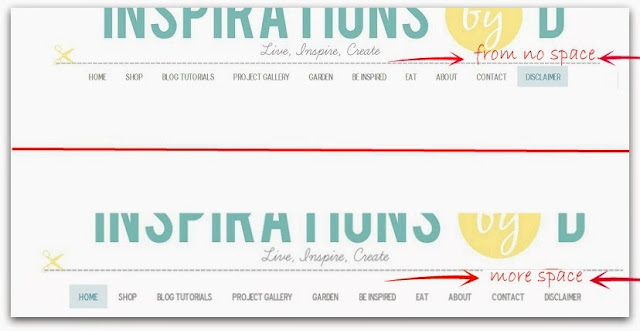
This tutorial is for Blogger blogs and serves for decreasing the amount of space between your "header" and "tabs" or increasing the space between the header and tabs.

Lower tabs on blogger

*Please note that not all templates are the same and they may vary in HTML codes.  If you have a set template, that is one that you have purchased from a designer, it may not work for you and you may have to contact that designer for adjustments. 

First, sign into your blogger account.  

1. Click on the blog that you wish to make the changes to on your dashboard.
2. You will be taken to your blog "Overview" screen, look at the list on your left and click on "Template".


3. On your Template screen, click on the "Edit HTML" button.


4. This will take you to the HTML editing screen.  This is where you will make your HTML code changes.  Before doing anything, make sure that your current template is saved. 

5. Make sure that the numbers on the left of your codes are all visible, that way you know if a line is missing. All the numbers should be visible.  If you notice that the numbers skip, you may see a small arrow next to that number, click on it and all the numbers should pop up.

6. Now that all your numbers are visible, scroll down to the "Tabs" section of your template code.  Each section has the title of that section. 


7. Scroll below the "tabs" title and look for " margin-top" in the border section of the tabs.


It may look something like this:

.tabs-inner .section:first-child ul {
margin-top: -1px;
border-top: 0px solid #ffffff;
border-left: 0 solid #ffffff;
border-right: 0 solid #ffffff;

* Note: There may be more than one "margin-top" section.  Make sure it is under the "border section" of your tab code.  Remember, not all templates will have this.

8. The number displayed may be "0" or a negative number; to increase the amount of space between your tabs and header, increase the number on your margin- top.  

For example:

 .tabs-inner .section:first-child ul {
margin-top: -1px;
border-top: 0px solid #ffffff;
border-left: 0 solid #ffffff;
border-right: 0 solid #ffffff;

9. Change the -1px to perhaps 8px.

 .tabs-inner .section:first-child ul {
margin-top: 8px;
border-top: 0px solid #ffffff;
border-left: 0 solid #ffffff;
border-right: 0 solid #ffffff;

 10. Then view it on your blog by clicking on your "preview template" tab.  DO NOT save yet!


Do not save anything until you are certain of the amount of space you want.  If you need more space continue to increase the number.  

If you want less space, decrease the number.  Play with the numbers until you are satisfied with the look of your tabs.  When you reach your final decision, save your work by clicking the "Save template" tab.  You are now done.

If you have any questions, please contact me or leave a comment below.


You Can't Go Wrong With Flowers

I love flowers, don’t you?  There is no excuse when trying to decide a gift when one remembers how happy people get when they receive a gift of flowers. Ask any woman and she can probably describe in detail the flowers, arrangement and date of the last flowers she received! The hard decision may not be in what gift to choose, but which flowers and in what arrangement! Fortunately, florists are ready to help and offer suggestions with any decision.

Red roses have long signified passionate love, but couples are not the only ones who delight in a gift of flowers. With the many choices of flowers available today, and throughout most seasons, any flower or combination of flowers can be sent and received as a communication of thoughtful consideration that truly touch the recipient's heart. Almost any occasion is an opportunity to send flowers. The convenience of shopping online can send a thoughtful gift to anyone, anywhere, with a simple click! For example your recipient lives in Australia; sites, such as freshflowers.com.au are set up to make the process easy with a vast array of flowers for any occasion.

Just imagine the delight on your mum's face when she opens the door to a delivery person holding an arrangement of Mother's Day flowers or a birthday bouquet. Fathers are equally pleased with a floral arrival on Father's Day. Fresh flowers to celebrate a newborn's birth, as a holiday gift and to commemorate a new home are other events appropriate for sending flowers. Flowers also make a thank you more special and sincere. Choosing a flower arrangement as a hostess gift is more personable and longer lasting sentiment than some other choices. 

A special occasion isn't necessary to send flowers. Most people can remember picking flowers for their mothers while playing outside. My son’s face lights up when he gives me flowers and it touches my heart at the thought that he knows how much I love them. It is a sure way to make someone's ordinary day transform into a special day. In fact, for many days after their arrival, the presence of fresh flowers will make those days festive. 

Flowers do not have to have to be a right size or color. There is no worry in duplicating a present and no registry is needed. They are always appreciated and always create instant smiles and pleasure. They are the perfect gift.

This is a Sponsored post written by me on behalf of freshflowers . All opinions are 100% mine.

Duck Tape® DIY: Zipper Pencil Pouch

This post brought to you by Walmart. All opinions are 100% mine.
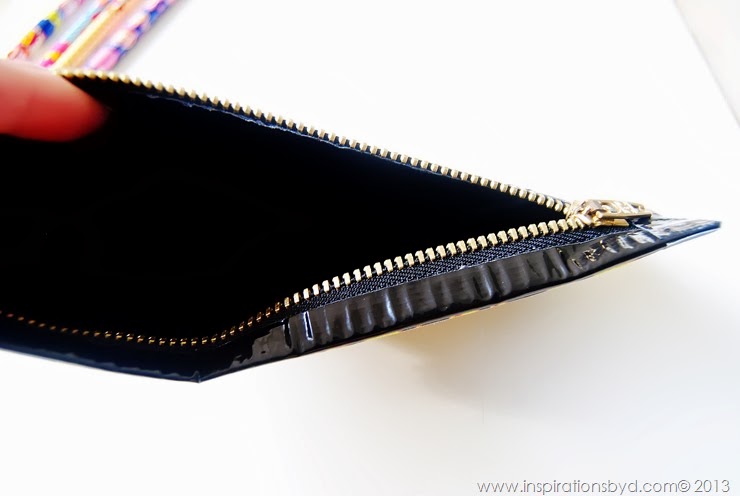
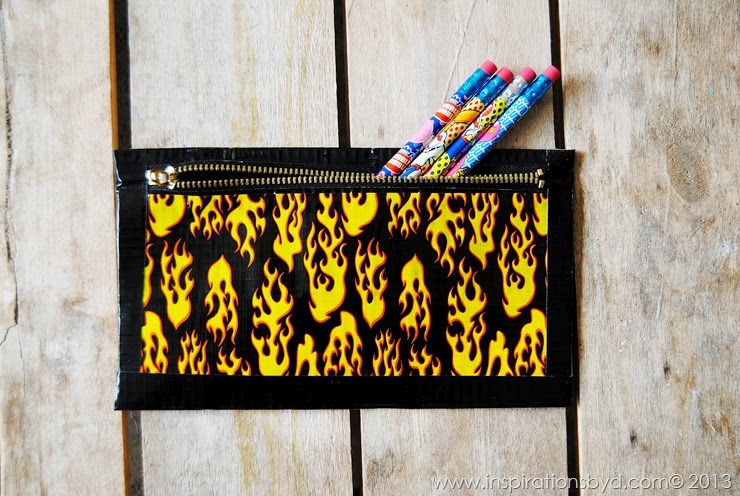
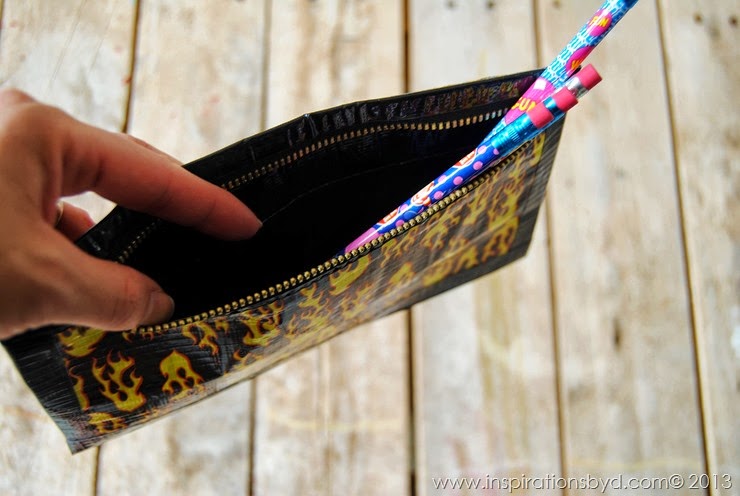
Duck Tape Pencil Pouch
On a recent visit to Walmart, I noticed a full assortment of  Duck Tape® for back to school.
I have seen Duck Tape® before, but I was impressed with the variety of prints, colors, and Duck Tape® sheets. School starts soon, so I had to embark on a DIY Duck Tape® quest. 
DSC_1904
Just in case you are not aware of all the amazing things you can do with Duck Tape®, read on!
You can use Duck Tape® to create, embellish and decorate!  You can make things for teachers as welcome gifts, you can make a custom name plate for your children's desk, a pencil pouch, wallet, back pack, folder, or snack bag. Older students can cover their books in paper bags and embellish, decorate, customize with Duck Tape®.  

Duck Tape® is a creative and inexpensive tool for all.  Today I am incorporating Duck Tape® from my local Walmart to make a zipper pencil pouch for my little boy.  He is really excited about this project because he gets to help create his very own pouch. Let me show you how we made our Duck Tape® Zipper Pencil Pouch.
51sDxXCwl8L._SL500_AA300_
MATERIALS:
  • Duck Tape®
  • Duck Tape® Sheets
  • 7 inch zipper used for jeans
  • scissors & x-acto knife
  • cutting mat (optional, but very helpful)
  • E6000 glue (optional hot glue & hot glue gun)
  • ruler

INSTRUCTIONS: 
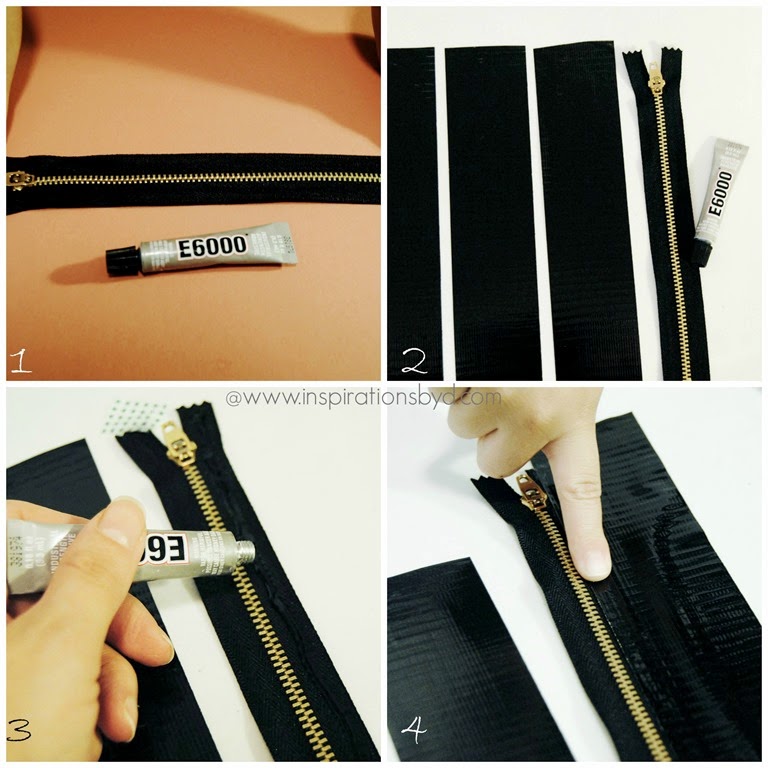
  1. Have the supplies on hand to start.
  2. Cut a few strips of tape about 11 inches long, as seen in # 2 below. Place them on your cutting mat, it makes it easy to peel off when needed.
  3. Glue the edge of the zipper from top to bottom, clamp facing up, as seen below.
  4. Take a strip of your tape and line it up with the edge of the zipper avoiding covering the zipper teeth as seen on #4 below. Press firmly, so it is secure. It is okay if the tape is longer, than the zipper, you'll cut the ends later on.Pic1
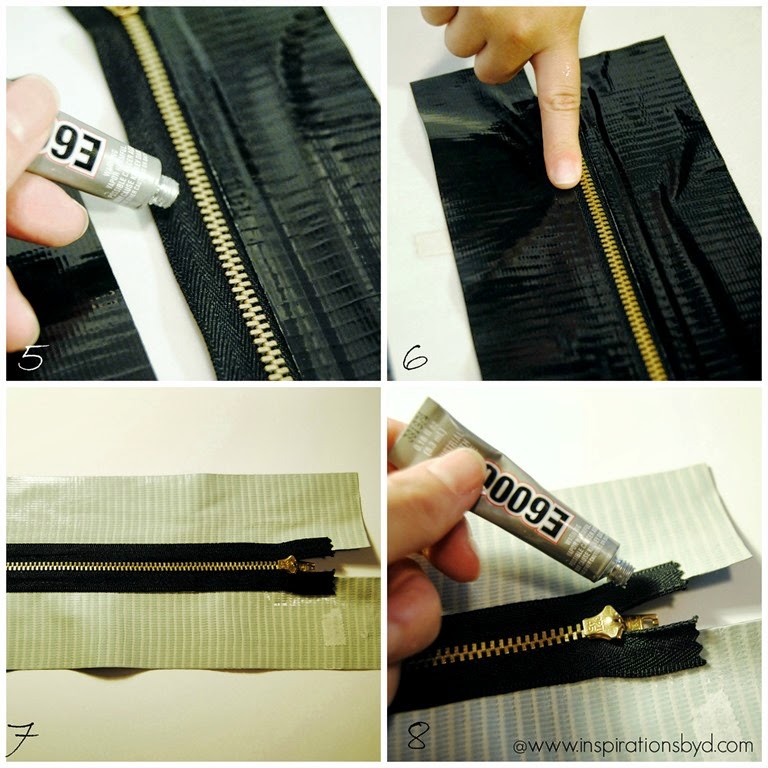
  5. Add the glue to the other side as seen below, all along the edge of the zipper.
  6. Grab another strip of tape and line it up carefully, do not to cover the zipper teeth as seen below.  Make sure your surface makes it easy to peel off the tape, a good cutting mat will do.
  7. When both sides have been attached to the tape, flip it over to the underside of the zipper.
  8. Now you will do the same on this side as you did on the opposite side.  Pour a bit of glue up and down along the edge of the zipper as seen on #8.  Pic2
  9. Press tape on the seam, repeat the same thing to the other side.  
  10. Glue the edge, then press tape firmly along the edge over the glue area.
  11. When all sides have the tape over the seem, fold one side of the tape (clasp facing down) over as seen on #11 make sure that you leave 1/4 inch space between the zipper teeth and the edge of the fold, see #12.
  12. Turn the fold over leaving a 1/4" space above the zipper area as seen below.
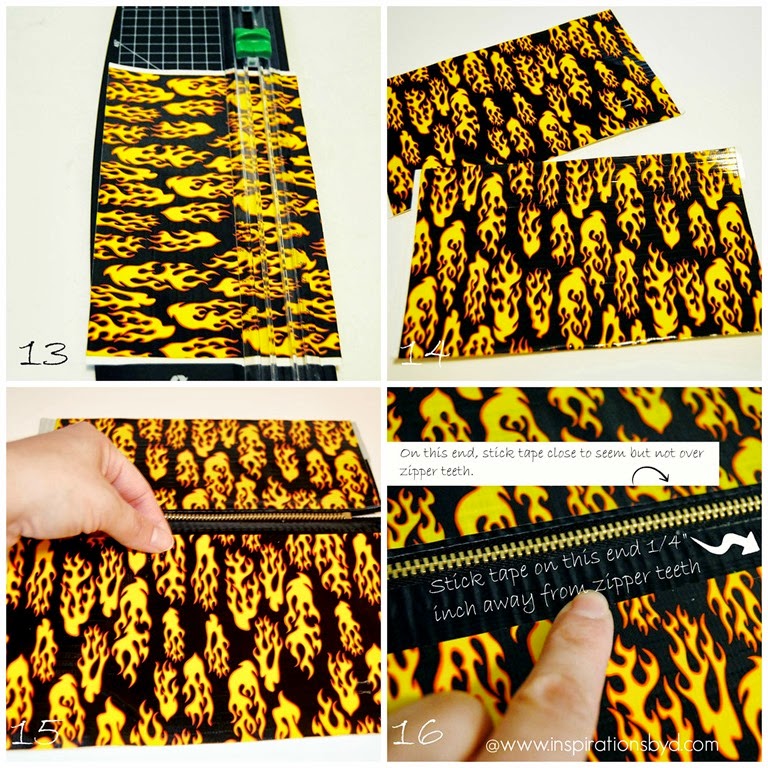
  13. Now you will start cutting your printed Duck Tape® Sheet. 
  14. Cut your sheet in half, the short end as seen below. There is a film on the back to protect it from sticking to anything, remove it but be careful, it will get stuck to you or something else, so remove it when you are ready to stick it to the black tape.
  15. Turn your zipper with the clasp facing up.  Measure your sheet to make sure it covers the black tape already adjust on the zipper.  Line up the print tape with the seam of the zipper over the black tape. As seen below.  
  16. On the other other side leave 1/4" space as you did before with the black tape, as seen below on # 16.Pic4
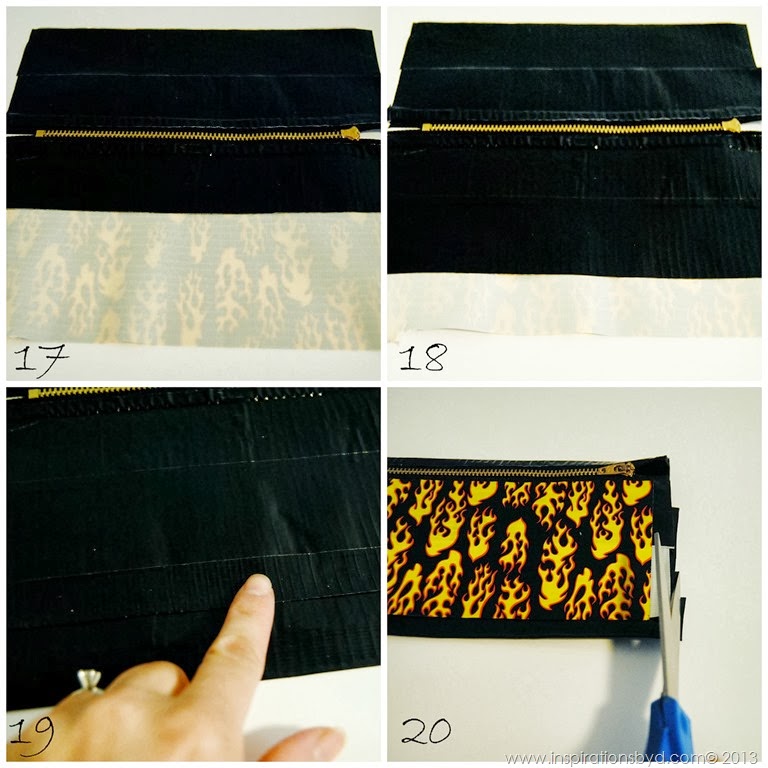
  17. When the print tape is on the black tape, flip it over to the underside (zipper clasp down).  You will see the sticky side of the printed tape, this is where you will stick on the black tape, forming tape fabric if you will. 
  18. Overlap each strip by 1/4" inch.  
  19.  If you miss an area that's small, just cut a narrow strip as seen below, and tape on.  When both sides are covered in tape, flip it over.
  20. Fold it and cut off any extra tape to make it even and straight on the sides, do not cut off too much.  Leave about 1/4" space from the ends of the zipper as seen on # 20 below. Do the same on the other side.  Cut the bottom evenly as well. Pic5
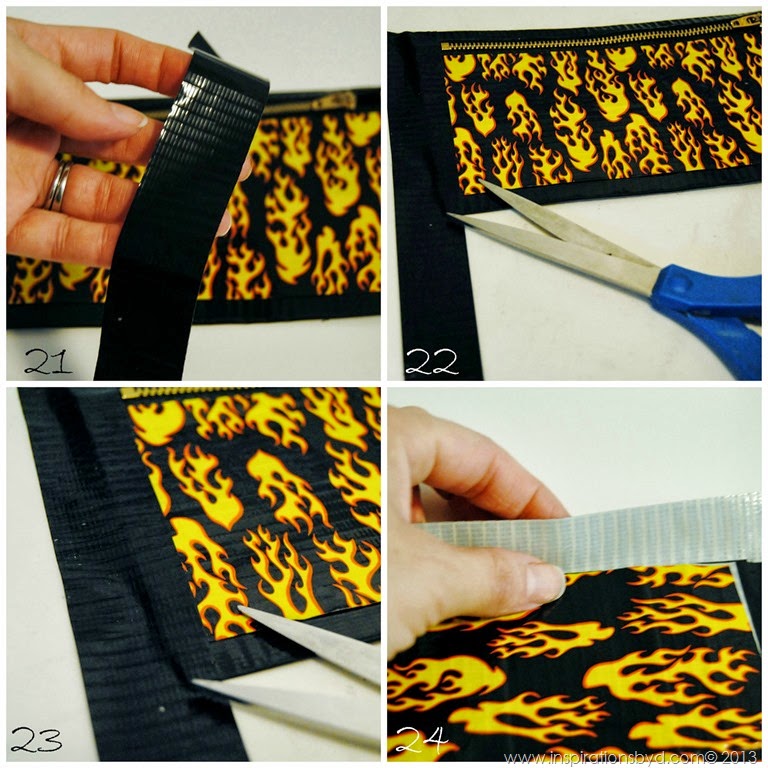
  21. Cut a 8 inch strip of tape in half, the long side. It's easy if you cut it using your cutting mat and x-acto knife.
  22. Tape 1/4" of one side of the pouch as seen below.  
  23. Mark where you will cut the end, then cut the excess tape with x-acto knife.
  24. Flip it over and fold the tape closing the seam, press firmly.Pic6
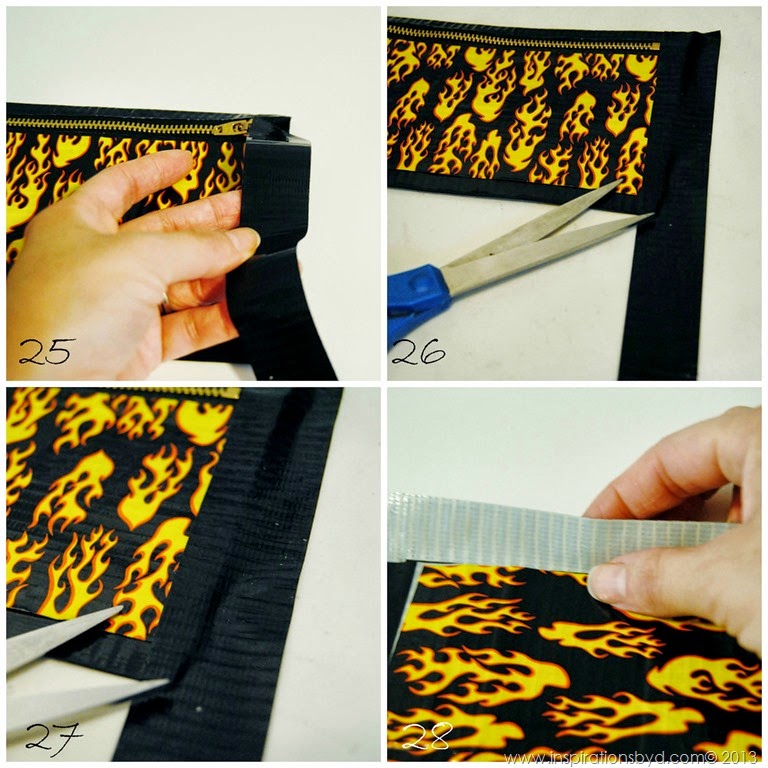
  25. You will repeat the same to the other side of the pouch. Cut a 8 inch strip of tape in half, the long side.  It's easy if you cut it using your cutting mat and x-acto knife.
  26. Tape 1/4" of one side of the pouch as seen below. 
  27. Mark where you will cut the end, then cut excess tape with x-acto knife.  
  28. Now it's time to close the bottom seam. Pic7
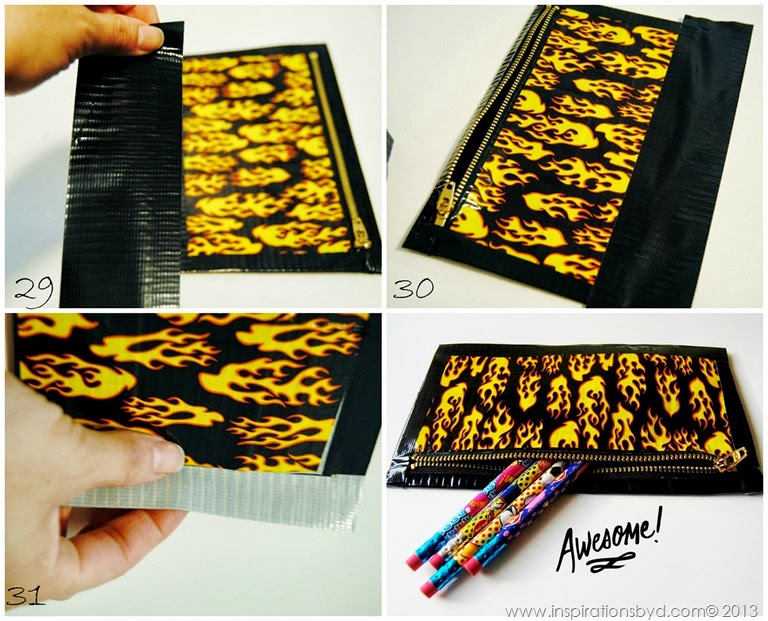
  29. Cut about 10 inches of tape and press half of the tape on the bottom seem, as seen below.
  30. Press firmly.
  31. Flip it over and fold the tape to close the bottom seam, press firmly. Cut off any excess tape   from the edges to give it a clean look and you are done!
Pic8
Need a pouch for your children, snack bags, book covers?  Make them all using Duck Tape® available at your local Walmart or Walmart online. With every school list there is a great use for Duck Tape®, buy Duck Tape at Walmart.  Follow @Duck Brand for tons of creative ideas and inspirations.  Happy Crafting!
Pencil PouchDSC_1915Duct Tape Pencil PouchDuct Tape Zipper Pencil Pouch


Travel Diary: Night Photos- End of Trip

  Here are a few of my favorite dusk to dark photos from the resort in the Dominican Republic.  
This resort is called Iberostar Costa Dorada.  It is gorgeous, especially at night when
the different colors pour forth in every direction with the help of lights.  My photos do no justice.
The food was amazing, the service was awesome, entertainment was amusing, and the wedding was
fabulous.  If you are ever in that part of the world, this is a must.  It has been voted one of the top
resorts to visit around the world.  This is the last bunch of photos of our trip, I hope that you enjoyed.

Travel Diary: Around the Pool

The hotel provides many activities to keep you entertained and the view alone is amazing.
When you step toward the back of the pool, you can see the mountains in the background
and it is a beautiful sight.  


Slow Cooker Raisin Bread Pudding

Bread Pudding
This is a slow cooker recipe, but I'll share a little secret 
with you.  If you want it done fast, pop it on the stove and 
it will get done a lot quicker than the slow cooker.  
When you are planning something sweet after a good meal, 
this is a no brainier.  But what's that?
The doorbell rings and you have guests?  
This recipe can be done fast on the stove with minimal ingredients, 
it's delicious, simple, and it makes the house smell so good!
To make this yummy raisin Bread Pudding, you will need the following:

8 slices of bread, cubed
4 eggs
2 cups  milk
1/4 cup sugar
1/4 cup butter or margarine melted
1/4 cup raisins
1/2 teaspoon ground cinnamon 

SAUCE:
2 tablespoons butter or margarine
2 tablespoons all-purpose flour
1 cup water
3/4 cup sugar
1 teaspoon vanilla extract
Place the bread cubes in a greased slow cooker: 
In a bowl, beat the eggs & milk; stir in the sugar, butter, raisins & cinnamon.  
Pour over the bread cubes; stir.
Cover & cook on high for 1 hour.  Reduce heat to low; cook for 
3-4 hours or  until a thermometer reads 160 degrees. 
Just before serving, melt the butter in a saucepan.  Stir in the flour until it is smooth.
Gradually add the water, sugar & vanilla.  Bring it to a boil; cook & stir for 2 minutes
or until thickened.  Serve with warm bread pudding.
Makes 6 servings.
For on the stove top use same method, but cook for less time, 
about 15-30 minutes or until it reaches 160 degrees, on medium heat. 
Cook & stir  Make sure you stir occasionally, so it does not stick
to pan.  You will notice the bread will expand and it will get thick.
Then follow the sauce directions & enjoy!

How to Fix Bubbled Paint on Wood Surface

fix bubbled paint
Have you painted something in your home, to then see the paint bubble up or splinter later on?
I painted my mantel and because of the heavy heat exposure from the fireplace, the paint bubbled 
on the top surface.  A quick fix to this problem was to remove the bubbled paint by scraping it off...
I sanded the area to thin out the paint and make it smooth.  Then I removed any saw dust and 
paint particles left behind with a moist towel.  Before doing anything else, I let it dry out completely.
When the surface was smooth and ready, I painted the area with primer.  Once the primer was dry,
24 hours later, I painted the area.  Now it looks good as new.  This was a small surface, so fixing it
was simple.  Larger projects may need more work.  Remember, all projects are different, due to
the type of paint and surface, so do your research before moving on to fixing a paint problem. 
Have you had paint issues?  How did you fix the problem?  Share your painting
projects in the comments below.

Travel Diary: The Beach


 We arrived in the Caribbean after the tropical storm had seized.  The weather was beautiful
after that, but the beach brought a lot of seaweed.  They cleaned it everyday, but it just kept coming.
We didn't let that stop us from enjoying the ocean.  Follow me on our walk to the beach below.
Isn't it beautiful?  They provide a lot of activities such as snorkeling, kayaking and more.
If you are ever in the Caribbean, this is one stop you might want to consider. 


Pin It button on image hover