Get ideas & inspirations delivered to your inbox. You won't want to miss a thing, so subscribe free to the Blog Feed or sign up for Free Email Updates on the latest projects, shop news, blog tutorials & more. Check out the Project Gallery, Garden, Recipes & Inspirations tabs above, to see what you have missed. Browse through the sidebar for this week's Popular Posts!
**Please note: Some links may be broken, if this happens, please let me know which post & search for the title of a post on the search tab on the right while I work on fixing the problem.---->

Cursive Handwriting Workbook Review

*Disclosure: I received this product for review. All views and opinions expressed are my honest 100% opinion.

     I received this Cursive Handwriting Workbook to review and to share my honest opinion 
about it.  This beautiful and simple 8" 1/2 x 11" workbook is intended for the young cursive 
learner in grades 2-3. The book has a table of contents and it also shows ways for a student 
to hold a pencil properly for writing comfortably.  It is pretty easy to follow and provides 
students with handwriting exercises that begin with the letters of the alphabet in cursive.
The workbook also provides cursive sentences for the student to practice, which is certainly
helpful as they learn to connect letters and form sentences. This provides a great opportunity
for learning how to read in cursive.

     Each letter is introduced with arrows guiding the student as to where to begin and end the
curved letter. The students practice by tracing over the letters and then they write it on their own.

     After the students learn to form the letters correctly, they write numbers and the names of
numbers.  As the young learner progresses to smaller sized letters, they then write the days
of the week and the months of the year. Students will find this cursive handwriting workbook
fun as it has 26 coloring pages with cursive handwriting practice, one for each
letter of the alphabet; a great reward after they are done with their cursive sentences.


     They are also given pages to draw with practice cursive letters. Toward the end of the book,
there are extra lines for either extra practice, or for providing the opportunity for them to write
their own sentences or little stories.

     I am currently helping my son learn and perfect his cursive handwriting skills. He has
improved his cursive writing a great deal. I can honestly say that with practice, he has
achieved beautiful cursive handwriting and he can read cursive as well, which I find to
be important.

     This is a great workbook for children to practice without overworking them. I would
recommend this book to any student looking to learn to write cursive.  It is simple, easy
and encouraging for those who wish to learn or improve their cursive handwriting skills.
To get your very own, click the image below to visit amazon.


Product Photography at Home

*This post contains affiliate links and I will be compensated if you make a purchase after clicking through my links. This is not a paid post.
Product Photography at Home 

     When I started my crafting hobby five years ago, I decided to sell the items I made by hand on
Etsy, but  I knew absolutely nothing about photography, branding and everything else that came along with the business.

     I look back at my first photographed items and wonder what in the world was I doing?  They are
dark, with shadows and uninteresting.  It took me a while to learn how to photograph products
on my own, taking a long time to actually get it, but what I have discovered is that I can learn quite a lot from the photography classes offered at Craftsy.  I have taken a class and have learned a great deal already.  One of the many classes offered there is the Product Photography at Home class.  For someone who knew nothing about aperture and shutter speed, I have come a long way.


     There is so much to learn and gain from the classes offered there. I am very happy with the classes and the best part is that I can go at my own pace.  A busy momma can only do so much right?

     I am in love with everything Craftsy offers because they have classes for all kinds of craft such as cooking, baking, sewing, painting, woodwork, watercolors, crocheting and so much more; the list goes on.  They have just added several new classes to their site with many to choose from depending on your interest.

     As to the photography portion, it helps with my Etsy shop, my blog and my personal photos. You will learn that light becomes your best friend when shooting.  I do most of my photography outside when it's nice and bright, avoiding direct light to my pieces.

     If you like, drop by Craftsy and check out the classes that are being offered.  I hope that you find one suitable for you.  Thank you for stopping by.


A Week in Pinning

Happy Weekend everyone!  Today I will be sharing my pins for the week.
These are just a few among the many I pinned.  I was inspired by Autumn!
Hope they inspire you for Fall decorating later in the month.
Rustic hand painted wood sign:
via


40+ Must-Try Fall Ideas | Positively Splendid {Crafts, Sewing, Recipes and Home Decor}:
via

I filled an old tool caddy with PeeGee hydrangeas and white pumpkins. The hydranges were at their peak to be cut and brought in for dryin...:
via

Use faux pumpkins to create stunning (and long lasting!) centerpiece arrangements:
via

Happy Pinning!


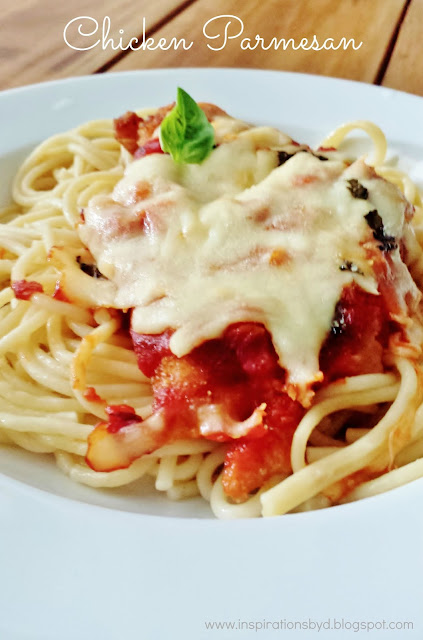
Chicken Parmesan Recipe

Chicken Parmigiana
This recipe is slightly different than other chicken Parmesans out there, it has less 
sauce and a bit crispier.  When I made this recipe for the first time, my little family 
loved it!

I will be sharing the recipe with you today, and hope that you like it as well.  
First let me give you a list of what you need to make this dish:

  • 4 skinless, boneless chicken breast halves
  • salt and freshly  ground pepper to taste
  • 2 eggs
  • 4 cups of bread crumbs or panko bread crumbs
  • 1/2 cup grated Parmesan cheese
  • 2 or more tablespoons of all-purpose flour
  • 1 cup of oil for frying
  • 1/2 cup of prepared tomato sauce 
  • 1/4 cup fresh shredded mozzarella cheese
  • 1/4 cup of fresh chopped basil
  • 2 tablespoons olive oil
  • 1/4 grated Parmesan cheese
  • box of spaghetti
  • 1 tablespoon garlic butter
  • 1 teaspoon salt
  • 1 tablespoon grated Parmesan cheese
  1. Preheat oven to 400 degrees.
  2. Place chicken breast into a large zip-lock bag, on a flat level surface, firmly pound chicken with a meat mallet to a thickness of 1/2 inch.  Season chicken thoroughly with salt and pepper.
  3. Beat eggs in a shallow bowl and set aside.
  4. Mix bread crumbs with 1/2 cup Parmesan cheese in a separate bowl and set aside.
  5. Lightly coat chicken breasts with flour coating both sides.
  6. Dip flour coated chicken in the beaten eggs, then transfer breasts to bread crumbs and coat both sides thoroughly.  Repeat for each breast.  Set aside breaded chicken breasts for about 15 minutes.
  7. Heat 1 cup oil in a large skillet on medium-high heat until it begins to shimmer. Cook chicken until golden, about 2 minutes on each side. The chicken will finish cooking in the oven.
  8. Place fried chicken in a baking dish and top with 1/3 tomato sauce. Layer each breast with evenly with mozzarella cheese, basil, Parmesan cheese and drizzle with 1 tablespoon of olive oil.
  9. Bake in the preheated oven until cheese is bubbly and chicken is no longer pink inside, about 15- 20 minutes.  A thermometer inserted into the center should read at least 165 degrees F.
For pasta:
  1. Boil spaghetti according to box instructions, add teaspoon of salt. 
  2. Drain when done.  Place in a bowl and add garlic butter, sprinkle with 1 tablespoon of Parmesan cheese and 1 tablespoon of olive oil. 
  3. Mix and serve with the Chicken Parmesan.
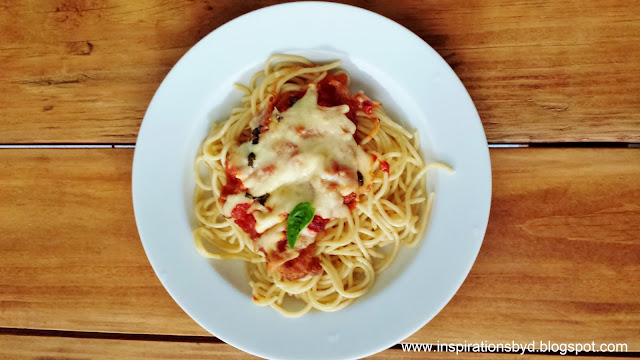
Chicken Parmesan
Recipe courtesy of All Recipes with adjustments.

Linked to:

Craft Ideas to Make with Cricut

**This post contains affiliate links and I will be compensated if you make a purchase after clicking through my links. 

Okay guys, now that you’re more familiar with Cricut Explore One™Cricut Explore Air™ and Cricut Design Space™, it’s time to chat about some of the really neat things you can create when you put it all together. 

As you’re getting familiar with your Cricut machine, it’s a great idea to take advantage of the free Make it Now™  projects and images that you get with Cricut Design Space™. 

For example, check out this adorable 3D Hot Air Balloons Mobile as seen above. It’s a fun, easy starter project and makes for the perfect baby shower or toddler’s birthday gift (and can you believe it's made with felt?). And what’s a gift without a card? Cricut has an incredible selection of card examples made with Cricut Explore machines. There’s even a whole selection dedicated to everything baby, which is where I came across this cute baby shower card

Birthday
What better way to tell someone how special they are than with a hand/Cricut-made card and gift? This super fun shaker card is perfect for a 21+ birthday. And even if you purchase a gift, you can always use your Cricut Explore machine to personalize it. For example, if you bought a friend a purse or a wallet, you could use your machine to monogram it with their initials. Or if you bought them a plain shirt or sweater, you could customize it with a fun image or statement. 

I love this sparkly pineapple t-shirt. All you need is a blank shirt, a roll of Cricut Iron-on, and images from the Cricut® Summer Love image set. 

Engagement/Wedding
Make your own beautiful table decorations, banners, party favor boxes, cards, and more for the happy couple in just a few minutes! You’ll find some really impressive ideas in Cricut’s Design Space, such as this lovely Mr. & Mrs. card

There are an unbelievable number of project examples in the Design Space, which are categorized by type (e.g. baby, holidays, home décor, school, food, etc.) and by level (easy, moderate, and advanced). You can also find a ton of great ideas for projects on Cricut's Blog and Pinterest page

The summer season is a perfect time to get your very own Cricut machine and familiarize yourself with Design Space and all the incredible projects you can create. Try out a few projects each month and you’ll be amazed at how easy it is. By the time the holiday season rolls around, you’ll be a Cricut pro and will wow your friends and family with your stunning crafting skills!  I hope that you have enjoyed these tips and ideas and get your craft on!

Happy crafting! 


Pin It button on image hover