Get ideas & inspirations delivered to your inbox. You won't want to miss a thing, so subscribe free to the Blog Feed or sign up for Free Email Updates on the latest projects, shop news, blog tutorials & more. Check out the Project Gallery, Garden, Recipes & Inspirations tabs above, to see what you have missed. Browse through the sidebar for this week's Popular Posts!
**Please note: Some links may be broken, if this happens, please let me know which post & search for the title of a post on the search tab on the right while I work on fixing the problem.---->

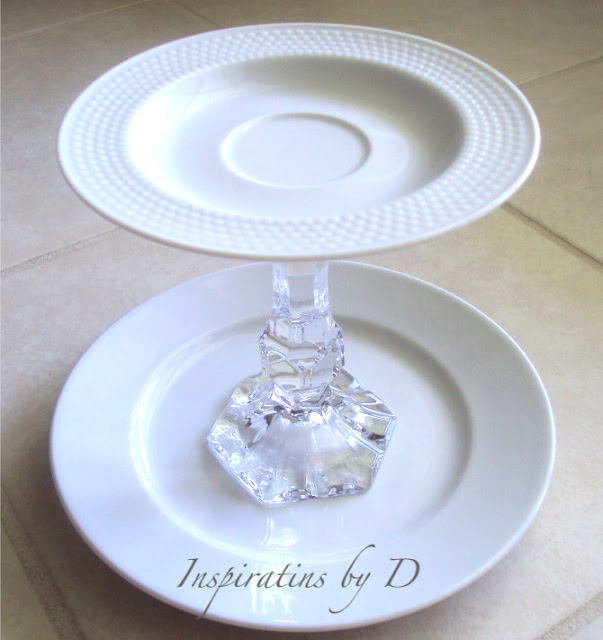
How to Make Tiered Storage Plates

source:bhg.com
 What a great bath compote for organizing small bottles and beauty supplies.
To make your own, all you need are the following:

  • Two plates (dinner plate, salad plate or dessert plate to vary both sizes)
  •  (Your option: Plastic, ceramic etc..)
  • Candle stick
  • household silicone sealant or hot glue (note: silicone sealant holds better)
Clean your plates and candle stick and remove any tags if recently purchased, and dry.
Apply a good layer of adhesive on your candle stick and center your candle stick on top of your plate.  (It takes a good 12 hours for the adhesive to cure).
Then apply another amount of adhesive to the other end of your candle stick and center the other plate.  Wipe any excess adhesive if you like.  Set and let dry for about 12 hours.
Once your silicone is dry, your tiered plates are ready for use.
How to Make Tiered Storage Plates
Voila!
Happy Crafting!

Life in the Back Yard

Upon our return home from the Big Apple, we found these lovelies in our back yard.
Blue Hydrangeas, beautiful aren't they?
We used Hydrangeas for the bridesmaids bouquets on my wedding day.  That was 12 years ago, wow! 
 New pink hydrangeas...
New roses and other beautiful plants...

...and new guests.
Baby birds are so precious, my son was so excited to see these little ones.
Can you tell that we love exploring our yard, it's always full of surprises.
Do you ever explore the surroundings of your house, apartment building...
What's in your backyard?


Don't forget to Rate My Blog @ Top Mommy Blogs

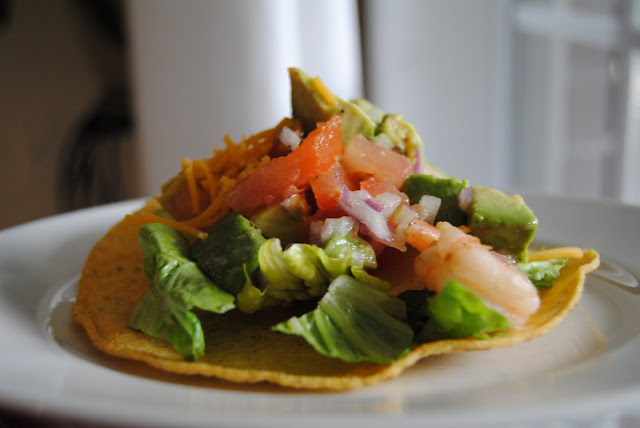
Shrimp Tostada with Avocado Salsa

You may serve it as a meal or serve it as an appetizer.
 It is crunchy and loaded with flavor. 

Inspirations by D

To start this off, you will need this:

  • Mission Estilo Casero Tostadas
  • 2lbs. large shrimp raw, peeled, tail off and deveined
  • 1/4 cup olive oil
  • 4 tsp chopped garlic
  • 2 tsp ground cumin (optional)
  • 2 tbsp red wine vinegar or vinegar of your choice
  • 1 1/2 tsp salt, kosher
  • 1 tsp black pepper
  • 2 avocados for each tostada, ripe, small, diced
  • 1/3 cup diced red onion
  • 3/4 cup diced tomato, seeded (fresh)
  • 2 cups of spring mix, fresh
Recipe Instructions:
Combine shrimp, 3 tablespoons olive oil, garlic and cumin in a bowl or plastic gallon-size zip top bag, toss to coat evenly, and marinade shrimp in fridge for an hour.  Combine vinegar, 3/4 teaspoon salt, 1/2 teaspoon pepper and whisk to combine until salt is dissolved.  Add  remaining 1 tablespoon olive oil and whisk to combine.  Add avocado, red onion, and tomato; toss to coat.  
Remove shrimp from marinade and season with 3/4 teaspoon salt and 1/2 teaspoon pepper (or to taste).
Heat non-stick saute pan over medium-high heat, saute shrimp in batches, 2 minutes per side.  Top each Mission Estilo Casero Tostada with 1/4 cup spring mix and divide shrimp and avocado salsa evenly among tostadas.
Shrimp Tostada with Avocado Salsa
Inspirations by D
You may change your ingredients a bit for your own variation. 
We had this for dinner and it was so delicious, what made it even better was eating it outdoors together, having good conversation and laughing under the setting sun, yum!

I hope that you enjoy!


How to Decorate Alphabet Letters

How to Decorate Alphabet Letters

It's that time again for more decorative crafting tips from yours truly.  My son and I decorated these lovely letters to display on his bedroom wall.  It's a great project for anyone on a budget.

Here is what you will need for this project:


1. Thick cardboard letters from craft store ex:.Hobby Lobby,Michael's...)
2. Scissors
3. Mod Podge
4. Paint brush
5. Decorative paper
6. Embellishments (optional)

The first step is to cut the decorative paper to the shape of your letters, leaving a quarter inch to wrap around it..


Using your paint brush and mod podge, brush the glue onto the letter covering all areas on the surface and also on the sides of the letter.  
Gently place your letter over the paper as seen above to cover the surface. 
 Use a bit of the glue to rub on the remaining paper, so that it sticks on well around the letter.
  Press the paper to the letter smoothing it out.
Repeat each step with each letter.  
If you have areas that are not covered with your decorative paper, use pieces of your remaining sheets to match the missing areas and cover with mod podge.
Wait 24 hours to dry completely.
Once your paper has dried on the letters, use your mod podge to coat the outside. 
(I used a glossy glue to give it a sheen.)
Set to dry another 24 hrs.
  Once it dries, you may decorate with embellishments.
Now your letters are ready for display.  Use picture wires for hanging.

Happy Crafting!

Gaga Over Brooklyn Cheeseburger

After a long day of shopping and visiting friends in the city, 
My husband, brother-in-law and I grew hungry and wanted something hearty to fill our bellies.
We spotted this new place, well new to us since we've been out of town for a while, "Brooklyn Diner".
The interior was clean and the decor held up to it's theme.  
The service was great and the food was amazing.
My husband and brother-in-law ordered the Brooklyn Diner Cheeseburger Deluxe you see here.  
I ordered another dish.  
My dish was wonderful, the best tasting Pot Pie I've ever had.  
The burger on the other hand was incredible!  
I tasted the burger and the tenderness of the meat and juicy flavor seeping from 
the beef was making my mouth water.
I'm not a burger person, I stick mostly to vegetables and sometimes lean meats, 
but this cheeseburger was absolutely delicious.  
After two bites of tasting, it left me wanting more.  
Next time I'm in town, I will be ordering this meal.

Don't forget to Rate My Blog @ Top Mommy Blogs

New York City on Etsy

Hello friends!  I am still prancing around the Big Apple and I am having a fabulous time. 
I only have a couple days left before heading back home and have not done everything on my to do list, but so far it has been wonderful.  There are friends and family I have yet to see, where does time go.

In the mean time, I wanted to share with you a couple of neat New York City Etsy finds.


Hope that you enjoy!


Don't forget to Rate My Blog @ Top Mommy Blogs

Happy Mother's Day

Wishing all mothers, a blessed and wonderful Mother's day!


What "Mother" Means

"Mother" is such a simple word,
But to me there’s meaning seldom heard.
For everything I am today,
My mother’s love showed me the way.
I’ll love my mother all my days,
For enriching my life in so many ways.
She set me straight and then set me free,
And that’s what the word "mother" means to me.
Thanks for being a wonderful mother, Mom!

By Karl Fuchs
Don't forget to Rate My Blog @ Top Mommy Blogs

Flowers & Travel


The flowers are growing and blooming and looking rather pretty.  I just wanted to 
share a couple of photos from my growing garden, I hope that you don't mind.
We are preparing for our travels and are taking care of the needs of our plants 
before we go.  
Always prepare when traveling to make sure that your plants will be taken care of.  
You may want to have someone water them for you or check that the sprinkler system 
is working properly, check that the misters are functioning around the flower beds, 
and that all the timers are set for watering.

For potted plants that you have indoors, you may want to take them out 
with the others or have a friend take care of them, it all depends on how long you 
will be gone. I hope that you enjoy the lovely blooms above from my growing 
garden and enjoy your travels.

Don't forget to Rate My Blog @ Top Mommy Blogs


Pin It button on image hover