Get ideas & inspirations delivered to your inbox. You won't want to miss a thing, so subscribe free to the Blog Feed or sign up for Free Email Updates on the latest projects, shop news, blog tutorials & more. Check out the Project Gallery, Garden, Recipes & Inspirations tabs above, to see what you have missed. Browse through the sidebar for this week's Popular Posts!
**Please note: Some links may be broken, if this happens, please let me know which post & search for the title of a post on the search tab on the right while I work on fixing the problem.---->

Rooms That Inspire

I love the color used here for this lovely entrance by adding the blue bench.
I have had these photos in my files for a while,
I love the look of each room and hope that it serves as inspiration
to you as it does for me.
Unfortunately I don't know the source for these photos,
perhaps some may be found on Pinterest and others on Google.
Peaceful retreat.
 Hope that you enjoy these as much as I do, I love the simplicity of each room.
Do you have any favorite rooms that inspire you?

Small Mudroom Entry Reveal!

The Mudroom Entry project is finally done!
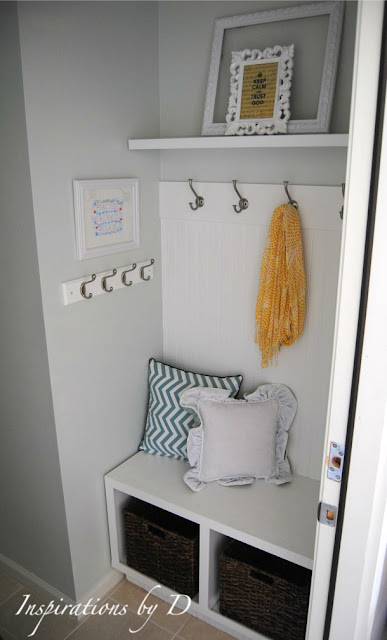
AFTER

BEFORE
It is finally finished and I am content with the
outcome, hurrah!
Let's go back to the beginning of this project,
shall we.  It began here!
After Mr. M was done with the construction of this space,
I painted the walls, bench, bead board and hook
rail and was finished with the work here.  I wanted a different kind of shelving,
but we worked with what we had on hand to keep cost low.
We can always change it in the future.

With a few accessories in the space,
I was able to give it life.
I wanted to place a seat cushion on the bench,
but that will have to wait for another time,
for now this will work.
I added some personal touches and a bit of color for pop.
The oval picture frame on the right side of the
wall reads "love" and it holds my son's art work.
The art work on the left wall is by Katie Daisy Art and it
reads "practice patience please",
it is a great reminder of that virtue.
On the wall shelf above the hook rail,
you see two different size photo frames.
 I spray painted the large empty frame with white
spray paint and I left it as is, meaning no art work,
no glass or photo in it.
The point of that was to create a bit of an
architectural shabby look.
For the smaller frame I created my own art work and added
yellow to the background to coordinate with other pieces.
The white throw pillow is handmade by my loving mother,
she made this pillow for me when I first got married
several years ago.
It has two sides to vary in color and the chevron pillow
behind it is also two sided and from Target.
The baskets below serve to hide the shoes, slippers and other
items such as dog leashes and so on.
 On the opposite wall from this area are silhouette photo 
frames made by yours truly.
Creating this space and hand making most of the items
was so much fun and the excitement of it all was self-rewarding
 both for Mr. M and myself.  My favorite part of this area
is that it serves as storage and is functional for the whole family.


Our Trip Back Home: Remembering 9-11


When we drove home to New York City this past Spring, we visited Ground Zero to remember the victims of 9-11.  We witnessed part of the reconstruction of the site that will serve as a memorial for all the victims of that terrible day.

The construction workers work everyday to get these buildings up.

This is a view of the Freedom Tower/ Tower One.

This skyscraper will be several hundred feet taller than the World Trade Center.  It will mark the location of 9-11, so where ever you are in the city, you will be able to see it.

The actual prints of where the towers stood will be fountains marking the foundation of the Twin Towers with the names of all the victims of 9-11.  Under the fountains, deep in the foundation of the the two towers that once stood there will be the Memorial Museum.


We always visit this location when ever we are in New York City, we all have our stories of that day. 
Do you remember where you were and what you were doing?

Cut in Half; How God Mended Me with 23 Miracles Review

Cut In Half: How God Mended Me with 23 Miracles
I enjoy a good read once in a while especially if it’s about a real experience, a life lesson and if it's a Christian based story.  I have received the book “Cut in Half”, by Ana Le Roux the perfect description of the above to review from Bring It On Communications.

Do you believe that miracles happen everyday?  This is a story of an average 30 something woman who after three weeks of giving birth to her second child is struck by tragedy -a violent head on collision.  The force of the impact thrust her forward with such intensity that it literally cut her in half!

Ana Le Roux would tell you that she was set to die that day, but instead, after seemingly endless dialogue with God, she relinquished her freedom of choice to Him.  Cut in Half tells how in that instant Ana opened her eyes and began to experience the most amazing gift of healing.

In her awe inspiring testament of God’s love, Ana proves that miracles are not just an archaic phenomenon found in scripture; they happen every day in a variety of ways.

About the author:
Image of Ana le Roux
Ana Le Roux is not your average housewife.  With a titanium plate embedded in her back and a limp to her walk, she takes every step of life with humility, gratitude and optimism.  Ana’s fate was sealed when in a tragic moment; she instinctively and selflessly sacrificed her life in an attempt to save the lives of her children that changed her life forever.

My personal Review:

What an incredible story of survival and surrender, allowing the miraculous power of God to work in her life and in her body!

Each chapter chronicles a portion of her journey and the miracles that took place.  Roux’s explains that at the end of each chapter there are sections and she indicates what each section entails, so that the reader can have a better understanding of her story.

The first part of every chapter is about retelling her story.  The second section is called “food for thought”, and it’s designed to help you reflect on the preceding story.  The third is the “Soul Searching” section.  She thought was necessary to include.  It reflects on your own life to see all the wonderful things that God has done for you.  Reading this book you will find quotes from scripture, mostly seen in the beginning of her chapters.

Once I opened the book I could not put I down, it was captivating and visual.  It was as if a friend was telling me what had happened to her and the details of her story kept leading me to the next moment.

I like how she shares that miracles are not limited to strangers or “special” people, but they are a reality in our lives everyday.  She also desires to dispel myths that we come to believe; Phrases, words or clichés that we use everyday that diminish God’s participation in everything we do, words such as luck, coincidence, destiny, being in the right place at the right time.

You take away from this story a sense of hope, gratefulness, and believing that miracles do happen everyday, big or small.

It is a touching story that will make you view life differently.  

For more reviews on books like these go to Tell Us the Truth Reviews.

(Disclaimer) I received this book for review puposes.  All Opinions are 100% mine.

Mudroom Entry Project (Part II)


We have been working hard to bring this small space to life by using our imagination. We started with a dull, bare and empty white space, remember this?  

With a little patience and elbow grease, we were able to make this spot functional.  The bench is finished, the bead board is up, the pallet is cut and in place, the hook rail is on the wall and some paint has been brushed on and all we need now is to add accessories.


I'm thinking of something like the items below.
hallway
The collection you see here is an idea of what I want for the space.  I want to keep it minimal and open to changes in accent colors for the different seasons.  Right now it looks pretty blah, but once these are up, it'll give the space life.  The walls will be painted a pale grayish blue to keep it clean and open unless I change my mind, I'm known for that.
I want to add a pop of color to make it stand out!  Perhaps adding an accent pillow along with the one featured here or baskets under the bench for storage.  I'm headed over to Pinterest for inspiration.
Stay tuned for the final reveal coming soon!
Let me know what you think so far, feedback or ideas will be greatly appreciated!

How to Make a Hummingbird Feeder (Updated)

How to Make a Hummingbird Feeder
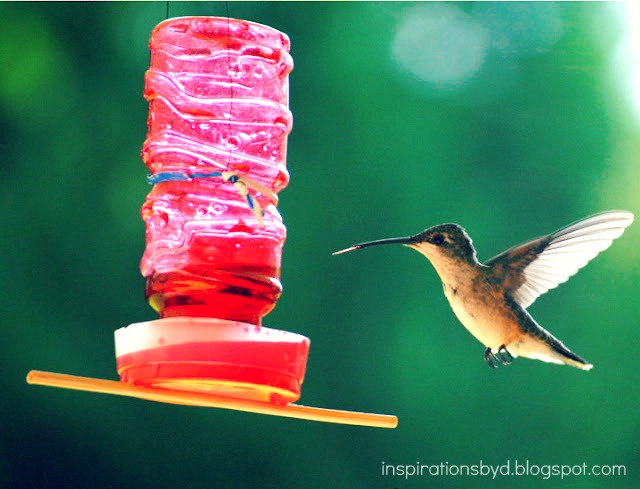
Look at what we captured by photo outside our kitchen window!  
I didn't have enough time to adjust the settings on the camera and started snapping 
photos immediately after spotting this little guy.  
We were so excited because we had just made this hummingbird feeder and this was 
just minutes after hanging it up.  Do you want to make one?  If so this is what you need.
Supplies:
 an empty bottle
 plastic cup
hot glue gun
 wire
 and a skewer.
We cut a plastic cup in order for the bird to be able to drink their sweet nectar.
Using the original cap, we poked five holes which allowed the nectar to flow down.
The bottle cap was hot glued to the plastic cup leaving some space between the cap and cup to 
allow the flow.  Only 4 to 5 small drops of glue was used to hold it in place.
The final step was hot gluing a skewer stick to the bottom of the cup which serves as a perch.
I  wasn't sure this feeder was going to work.  Sure enough within two hours 
of hanging it up, the hummingbirds started coming.  Now we get to see these little 
guys outside our kitchen window everyday, seriously, like every 5 minutes.  
We love it!
Do you have any hummingbirds in your area? 
 What type of birds do you see outside your window?

Don't forget to Rate My Blog @ Top Mommy Blogs

Yellow Accents

I wanted to share some yellow inspirations with you today.

google


Do you have anything yellow in your home or closet? 
I have a yellow cardigan, scarf, dress and a tee shirt.

Don't forget to Rate My Blog @ Top Mommy Blogs

Mudroom Entry Project

I decided to give you a sneak peek at what we are building.  The area you see here is a waste of space off of our garage door entry, so we decided to do something special with it, something useful.  I was just tired of looking at our vacuum and broom there, not to mention the collection of shoes.  I want some orgaization in this tiny space.
As you can see here, we have already installed this "homemade" hook rail.


We purchased an oak board, cut it to fit the length of the space.  I primed and painted the board in white and Mr. M attached the nickel plated hooks you see here.  We found many already made hook rails, but I wanted ours to fill the space.


Mr. M and I purchased more wood boards at Lowe's and found a great pallet to work with as well, it was free!


Are you wondering what we are going to do with this pallet?
There were so many ideas in my head, but for now we used it for this project.
I already envisioned what this area was going  to look like and I couldn't wait to get started.


Mr. M started building immediately, then we noticed we were a wood panel short, so off to Lowe's he went while this cooler held it in place.


The bench has been constructed but some minor details will be added as we go along.  Here we are measuring the pallet against the bench because we have to cut it so that it can fit in the space.  The pallet will serve as a base to give the bench height and stability.


This pallet is going to hold this bench up without having to place molding or anything else for support.  He had to cut the back of the pallet to make it fit properly


I just kept adding things to this little project and he just kept hammering away.

Okay, so that is all you get for now, but are you visualizing what we're doing?   The final reveal coming soon!

Don't forget to Rate My Blog @ Top Mommy Blogs


Pin It button on image hover