Get ideas & inspirations delivered to your inbox. You won't want to miss a thing, so subscribe free to the Blog Feed or sign up for Free Email Updates on the latest projects, shop news, blog tutorials & more. Check out the Project Gallery, Garden, Recipes & Inspirations tabs above, to see what you have missed. Browse through the sidebar for this week's Popular Posts!
**Please note: Some links may be broken, if this happens, please let me know which post & search for the title of a post on the search tab on the right while I work on fixing the problem.---->

Showing posts with label Home. Show all posts

Mudroom Entry Project (Part II)


We have been working hard to bring this small space to life by using our imagination. We started with a dull, bare and empty white space, remember this?  

With a little patience and elbow grease, we were able to make this spot functional.  The bench is finished, the bead board is up, the pallet is cut and in place, the hook rail is on the wall and some paint has been brushed on and all we need now is to add accessories.


I'm thinking of something like the items below.
hallway
The collection you see here is an idea of what I want for the space.  I want to keep it minimal and open to changes in accent colors for the different seasons.  Right now it looks pretty blah, but once these are up, it'll give the space life.  The walls will be painted a pale grayish blue to keep it clean and open unless I change my mind, I'm known for that.
I want to add a pop of color to make it stand out!  Perhaps adding an accent pillow along with the one featured here or baskets under the bench for storage.  I'm headed over to Pinterest for inspiration.
Stay tuned for the final reveal coming soon!
Let me know what you think so far, feedback or ideas will be greatly appreciated!

Mudroom Entry Project

I decided to give you a sneak peek at what we are building.  The area you see here is a waste of space off of our garage door entry, so we decided to do something special with it, something useful.  I was just tired of looking at our vacuum and broom there, not to mention the collection of shoes.  I want some orgaization in this tiny space.
As you can see here, we have already installed this "homemade" hook rail.


We purchased an oak board, cut it to fit the length of the space.  I primed and painted the board in white and Mr. M attached the nickel plated hooks you see here.  We found many already made hook rails, but I wanted ours to fill the space.


Mr. M and I purchased more wood boards at Lowe's and found a great pallet to work with as well, it was free!


Are you wondering what we are going to do with this pallet?
There were so many ideas in my head, but for now we used it for this project.
I already envisioned what this area was going  to look like and I couldn't wait to get started.


Mr. M started building immediately, then we noticed we were a wood panel short, so off to Lowe's he went while this cooler held it in place.


The bench has been constructed but some minor details will be added as we go along.  Here we are measuring the pallet against the bench because we have to cut it so that it can fit in the space.  The pallet will serve as a base to give the bench height and stability.


This pallet is going to hold this bench up without having to place molding or anything else for support.  He had to cut the back of the pallet to make it fit properly


I just kept adding things to this little project and he just kept hammering away.

Okay, so that is all you get for now, but are you visualizing what we're doing?   The final reveal coming soon!

Don't forget to Rate My Blog @ Top Mommy Blogs

A Touch of Blue

source: bhg
pinkwallpaper
(source)

Etsy
Just a touch of blue to serve as inspiration for the home.  
Do you have anything blue around your home?

Linked to:

How to Re-Paint Oak Mantel

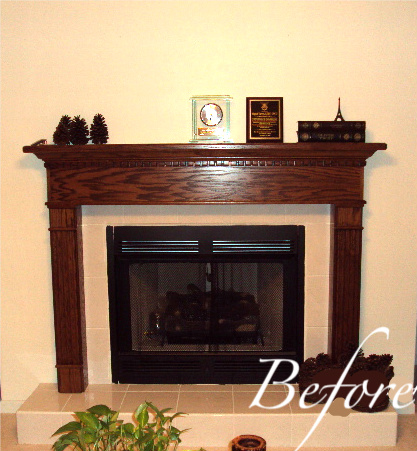
  The mantel surround had a dark oak stain and although it did not look bad, it clashed with our current wood furniture, so I decided to re- paint it.  

Here is the before:
How to Re-Paint Oak Mantel
Here is the After:
How to Re-Paint Oak Mantel

This project required one coat of primer and two coats of paint.  I sanded it gently,  just to dull it a bit, then  I gave it a coat of Multi-Purpose Oil Based Primer.  I used this Sherwin William low odor formula since we have asthma at my home and strong paint odor is a trigger.  So this paint worked out pretty well, no odor and fabulous coating and no asthma attacks, whew!


The next day I gave the mantel two coats of paint, "Swiss Coffee" by Benjamin Moore semi- gloss and I painted the wall a "Putnam Ivory" to make it stand out a bit.
I'm happy with the new look, to finish it off I would love to change the white tile, but that's a different project.  Thank you for looking.


Pin It button on image hover